
Note part 1: ISA
Lab 1
<<, >> 运算符
>> 表示全体 bit 向右移一位,最高位自动补上 0/1.
关于最高位的处理:如果是 signed (二补码),那么最高位补上 0 还是 1 取决于最高位是 0 还是 1. 最高位如果是 0 就补上0(让正数变小);最高位如果是 1 就补上 1(让负数变大).
note: 往绝对值变小的方向变化!
如果是 unsigned 则最高位自动补 0.
ex: signed 1000 >> 2 = 1110. unsigned 则 1000 >> 2 = 0010
至于 << 左移,不管 signed 还是 unsigned 都是在右边自动补 0. (note: 往绝对值变大的方向上变化.)
所以:
// 一个 int 中 bit 1 的数量
int numHighBits(int input){
    int count = 0;
    while (input != 0) {
        count += input & 1;
        input >>= 1;	// 正数则正常,负数则死循环
    }
    return count;
}
这个程序是错的. 因为当取负数时,这个 input >>= 1 会让 input 永远停在 -1. 它会变成 1,11,111,1111,11111,111111,...
// 只能这么写:
int numHighBits(int input){
    int count = 0;
    for (int i = 0; i < sizeof(input)*8; ++i){
        if(input & 1) {
          	++count;
        }
        mask = mask << 1;
    }
    return count;
}
sizeof
sizeof(n) 表示这个 n 的 datatype 占的 bytes 数(而不是 n 这个值本身占用的字节数)
比如 n 为 int,那么 sizeof(n) = 32 或 64,取决于语言.
所以拿 sizeof(n)*8 就是这个 datatype 占的 bits 数.
int numHighBits(int input){
    int count = 0;
    for (int i = 0; i < sizeof(input)*8; ++i){
        if(input & 1) {
          	++count;
        }
        mask = mask << 1;
    }
    return count;
}
用 nor 表示 not, and, or
note: nor 只有两个 bit 都是 0 时才是 1,其他都是 0
所以 not(A) = nor(A, A)
and(A, B) = not(or(not(A), not(B))) = nor(not(A), not(B)) = nor((nor(A, A)), (nor(B, B)))
or(A, B) = not(nor(A, B)) = nor(nor(A, B), nor(A, B))
Lec 4 - ARM (LEG subset)
ARM arithmetic && logical instructions
(bitwise)
-
ADD, ORR(inclusive), EOR(exclusive) 都是 x1 = x2 * x3
-
ADDI, ORRI, EORI 是对应的 I-instructions (第三个 field 是常数): x1 = x2 + #immediate(3)
-
LSL, LSR: logical shift left/right
语法:x1 = x2 <</>> #immediate(3)
这个太重要了(悲),LSL 还简单就是自己加自己,LSR 就难 implement 了,有一个现成的 instruction 好多了
逻辑运算都是把 x2(reg) 和第 3 个 field(reg/immediate) 的运算结果存到 x1 (reg)
ARM memory instructions
我们的便宜 ISA LC2K 的 addressing 方式是 by word (4 bytes in IC2K),意思是每次 PC+1,实际上 PC 移动的是向前 4 个 bytes。这意味着我们无法处理 char 等长度小于 4 bytes 的数据类型。(因而我们的 LC2K 不是功能完备的 ISA)
word 的大小就是一个 instruction 的大小,也就是 ISA 的数据宽度(
64-bit addressing
64-bit ISA 表示寻址范围是第 0 - 2^64 个 bytes:
(0x0000 0000 0000 0000 - 0xFFFF FFFF FFFF FFFF)
(Note: 这里这个 8 位 hex 数里面的 1 并不是 bit 而是 byte!!
如果要存储一个 4 bytes 的 int,那么就是 for example 地址 0x0000 0000 1000 0001 - 0x0000 0000 1000 0004 都是这个 int)
note: 2^64 个 bytes 是理论上可达到的 addressing 范围,但是实际上受到内存条等具体硬件的限制。
而 ARM 中一个 instruction 和一个 word 的长度是 4 bytes,也就是 32-bits,并不是 64 bits!64 bits 仅仅代表地址编码的长度,而这个长度和 word 的长度毫无关系。(一个 half word 是 16 bits,一个 double word 是 64 bits);
一个 word / instruction / 其他数据类型的长度,代表它们占据几个 bytes,即一个 object 占据多长的一块地址。
因而如果我们需要往前移动 a int,我们就要 increment address by 4;如果要往前移动一个 char,我们就要 increment address by 1。移动的单位都为 byte.
ARM 中的 regs
ARM 一共有 32 个 regs,因而在一条 instruction 中要以 5 个 bits 来 encode 一个 reg.
ZXR 表示 R31 寄存器,这是一个零寄存器,存储的值总是 0.
R15 是 PC 寄存器
R30 是 link register
memory instructions (data transfer)
-
LDUR,LDURSW,LDURH,LDURB:语法:x1, [x2, #simm9]
把 (1) double word;(2) word;(3) half word;(4) 一个 byte 从 [x2 + #simm9] 的 memory 中复制到 x1 reg 上
其中 x2 是一个 地址,#simm9 是一个 9-bit signed immediate value (-256~255) 作为 offset,x1 是一个 reg
注意:LDUR 复制 8 bytes,LDURSW 复制 4 bytes,LDURH 复制 2 bytes,LDURB 复制 1 byte。
-
STUR,STURW,STURH,STURB同理,只不过是反向复制,把 x1 reg 上的复制到 [x2 + #simm9] 上
note: 唯一的区别是 LDURSW 的对应是 STURW 没有 S.
-
MOVZ,MOVK语法:x1, #m, LSL #n
把 某个 4 bytes 的 constant #m 放进寄存器 x1 从 第 n 位起左数的 16 位上。
比如 n = 16,那么会把 constant 放到 x1 的 [16,31] 位上.
MOVZ表示把 x1 的其他 48 位全部清零,MOVK表示保持其他 48 位不变.note: n 只能是 0,16,32,48 中的一个.
处理 load signed/ unsigned word
LDUR load 的是完整的一个 8 bytes (64 bit) 和 register 一样长的 word,所以直接 load 不用管 sign。
LDURH,LDURB 只处理 Unsigned,前面全部填上 0.
LDURSW 进行了一个 signed extension: 对于这个 word 的第 31 位,如果是 1 那么就前面 32~63 位上全都填上 F,如果是 0 那么前面 32~63 位上全部填上 0.
ex: 0x7654 3210 被 LDURSW 后是 0x0000 0000 7665 3210
0xF654 3210 被 LDURSW 后则是 0xFFFF FFFF F654 3210
至于 save word: 直接去掉 reg 前面 32~63 位,自动蕴含了 sign.
所以只有 LDURSW 需要考虑 sign.
Big Endian && Small Endian
Endian 表示在一个 half/double/standard word 内,bytes 的 ordering: significant bits 的地址在前面还是后面
Little Endian 表示 word 的 4 个 bytes 中从前到后是 insignificant 到 significant;big endian 反过来
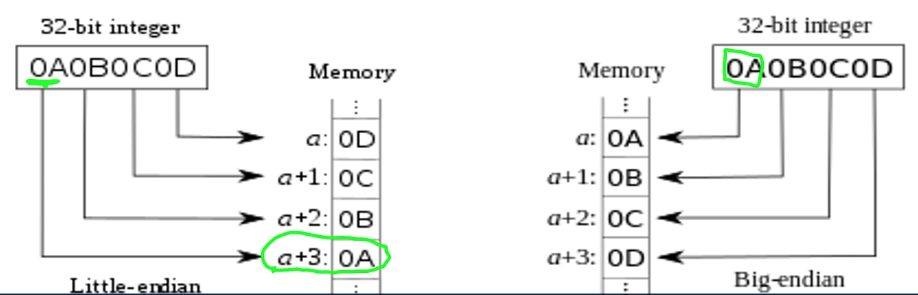
ARM 中两种都可以使用,只是要 consistent,我们默认使用 little
比如现在我们有两个 word 0xABCDEF12,0x12345678
那么:
| 0x1001 | 0x1002 | 0x1003 | 0x1004 | 0x1005 | 0x1006 | 0x1007 | 0x1008 | |
|---|---|---|---|---|---|---|---|---|
| 12 | EF | CD | AB | 78 | 56 | 34 | 12 |
Lec 5 - C to Assembly
为了方便(且迅速) read from memory,现代 ISA 要求变量必须是 aligned 的。
Padding for alignment
对于 Primitive object (int, char, etc)
Golden Rule: 对于一个 size 为 N bytes 的 primitive object,只需要存到下一个 mod N = 0 的 address 上就可以了。
比如现在在 0x1001,下一个 object 是个 int, 就要跳到 0x1004 上,中间的 3 格作为 padding 空出来。
对于 sequential object
array:只需要 treat 每个元素 as independent object 就可以,一共只需要 padding 一次
对于 non-sequential object
如果只有一个 struct object,那么看起来只要每个 primitive 成分分开 padding 一下就可以了,但是我们发现如果我们想要一个 array of struct objects 就会有问题。因为 beginning address 的不同会导致这个 struct array 中相邻的两个元素之间的 Padding 不同,这样这个 struct array 就很难 loop.

解决方法:
除了正常的 Padding 外,再保证
- struct 的 starting address 是 struct 中的 largest primitive 的倍数
- 整个 struct 的 total size 是 struct 中的 largest primitive 的倍数

note: data padding 是 C compiler 把 C 翻译成 assembly 的时候做的事情。在 struct 外面,有的 compiler 会 reorder variables to avoid padding,但是 在 struct 里面任何 compiler 都不会(C99 has forbidden it.)
因而 object 在 struct 内的排布顺序是根据 declare 顺序排序的。所以我们为了省 padding 的空间需要在写 C code 的时候留意一下变量排布。
Control flow (branching)
Sequencing instructions change the flow of instructions being excuted.
这是通过用 branching 调整 PC reg 实现的。
ARM branching instructions
Note:
- branching instructions 比较特殊,并不是 branch by bytes 而是 instructions 的数量,即 offsetfield 上是往前多少个 instructions 而不是多少个 bytes.
- 不像 LC2K 需要 branch to PC + offsetfield + 1,ARM 就是直接 branch 到 offset field 数量的 instructions,
Unconditional:
-
B #simm26
PC = PC + #simm26 * 4 位置的 instructions
-
BR Xt
Xt 必须包含了一个 instruction 的地址
PC branch 到去 Xt 这个 reg 包含的地址上面的 instruction.
-
BL #simm26
这是一个带 link 的 branching,通常用于函数调用:会先把 PC + 4 (本来的下一条 instruction 的地址)储存到 reg X30 (link register),然后跳转到 PC + #simm26 * 4 位置的 instructions.
conditional:
-
CBZ Xt,#simm19
如果 Xt 上的值为 0 则跳转
-
CBNZ Xt,#simm19
如果 Xt 上的值不等于 0 则跳转
-
B.cond #simm19
如果 cond 为 true 则跳转
这一条 B.cond 是比较 high-level 的 implementation,十分智能。我们下面详细讲述
Note: ARM 支持 label 跳转!
ex
Again: ADDI X3, X3, #1
CBNZ X3, Again
B.cond 的用法
我们需要一个 extra status register 存储 condition 的条件
但是这个寄存器并不是我们可使用的 R0 ~ R31 中的一个而是 ARM 的一个特殊的状态寄存器 CPSR
CPSR 中的 NZCV 四个 flags 分别在 31, 30, 29, 29 位
N (Negative flag): 第31位
Z (Zero flag): 第30位
C (Carry flag): 第29位
V (Overflow flag): 第28位
我们可以通过 CMP,CMPI 来比较两个 register / 一个reg和一个 immediate。
CMP X0, X1         ; 比较 X0 和 X1
B.EQ equal_label   ; 如果 X0 == X1,则跳转到 equal_label
在一次 cmp 后比较的结果会被自动存到 CPSR 中
然后我们可以使用 B.cond #simm19 / label 来 branch.
cond 有以下几种:
- For signed number: B.EQ 表示结果相同;B.NE 表示结果不同;B.LT 表示左边小于右边;B.LE 表示昨天小于等于右边;B.GT,GE 是大于/大于等于;
- For unsigned numer:B.EQ;B.NE;B.LO;B.LS;B.HI;B.HS
还有特殊的 cond:
**我们可以在 ADD, SUB, ADDI, SUBI 后面加上 S (ex: ADDS) 来表示 set flag,把这个运算的结果是否 Negtive / zero / overflow / generate a carry **
B.MI branch if CPSR 的上个 set flag 的运算结果是负的
B.PL branch if CPSR 的上个 set flag 的运算结果是 正/0 的
B.VS / B.VC branch on an overflow set/clear
B.AL always 执行,等价于 B
Lec 6 - Function call
我们 call function 的时候通常使用 BL,把 PC + 4 存进 R30 link reg 中,但是只有一个 Link reg,而我们如果有多个嵌套函数,就会损失 return address 的信息
当我们 call function 的时候我们要做这四件事:
- pass parameters
- save return address
- save reg values
- jump to called function
execute function 后我们要:
- get return value
- restore reg values
很显然,我们的 regs 是 finite 的,没法把所有 return address, reg values 都放进 regs 里(并且 data 的大小不一定适合
所以我们会把这些信息放进 memory 里(call stack)
和 memory 交换信息处理 data 肯定不如直接在 reg 上处理快,所以 ARMv8 的 solution 是:把 first few parameters 放进 regs (X0-X7),把剩下来的放进 memory 的 call stack 上。
Call Stack
ARM 在程序运行中会 allocate a region of memory,称为 call stack.
Call stack 用以 manage 所有的 storage requirements to simulate function call semantics.
- parameters (that were not passed through regs)
- local vars
- temporary storage (run out of regs 时)
- return address
- ...
每次做一个 function call 就会有一个 stack frame 被放上 call stack,并且这个 stack frame 在 return from function 的时候被 deallocate.
类似于 PC,我们有一个 stack pointer(SP,X28),keep track of current top of stack.
内存布局结构
stack 在最上方,最上部是封死的,新 frame 加入栈顶时,向下增长(栈顶在下面)。
heap 在 stack 的下方,动态内存被分配时,向上增长。
(stack 和 heap 分别朝相反的方向扩展,因此在内存不足或者栈和堆碰撞时,可能会引发 stack overflow )
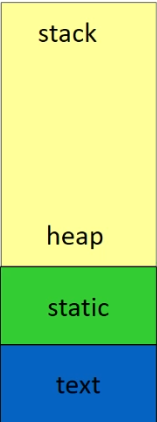
Static 段存放 global & static variables,在程序 loaded 时就被确定,在整个程序运行期间不变。
Text 段在最底端,read only.
一个程序中,dynamic memory goes to heap,static & global 的变量 goes to static;parameters & local variables go to stack
ex:
c int w; // w on static (global) void foo(int x) { // x on stack static int y[4]; // y on static char* p; p = malloc(10); // p on stack, the 10 btyes on heap //.. printf("%s\n", p); // "%s\n" on static }note: "%s\n" on static 的原因是这是一个 string literal,不可变,在程序编译时就固定,不论 foo 被调用多少次,它的储存位置和内容都不变。
Saving regs
Assembly 中,所有 functions 都只共享 32 个(ARM)regs
call function 后我们会 Overwrite regs.

所以我们需要 store reg values.
关于 save reg values 我们有两个办法:
-
callee saved: 被 called 的 function 在 overwrite reg values 前把它们 save 到 stack 上,并且在 return value 之前 restore 它们。
ex:
assembly main: movz X0, #1 bl foo bl printf foo: stur X0, [stack] //save X0 on stack movz X0, #2 ldur X0, [stack] //restore X0 br X30 -
caller saved: calling function 在 function call 前 save reg values on 自己的 stack,并且在 function call 结束后 restore 这些 regs.
assembly main: movz X0, #1 stur X0, [stack] //save X0 on stack bl foo ldur X0, [stack] //restore X0 bl printf foo: movz X0, #2 br X30
caller-save 和 callee-save 的优劣势
caller-save 的 must save: 在 call 完 callee() 之后,如果 callee() 下面还会用到某些 caller() 的变量,那么 call callee() 前必须 store 这些变量用到的 reg.
最小的函数不用 save,因为它不是 caller.
callee-save 的 must save: callee() 的 stack frame 里所有用到的 reg 都必须在它 overwrite 一个 reg 时 save.
最大的 main() 函数不用 save,因为它不是 callee.
所以显然优劣势:
caller-save 适合在 call 发生时它下面的 live variables 不多的情况
callee-save 适合 callee 的 local variable 不多的情况。
混用可以达到比较好的效果。
convention 上,我们习惯分出 caller-saved regs (通常为0-15) 和 callee-saved regs(通常为19-27).
我们希望在 main 中的变量尽量使用 callee-saved regs,在没有嵌套函数的函数中的变量尽量使用 caller-saved regs.
Lec 7 - Linker
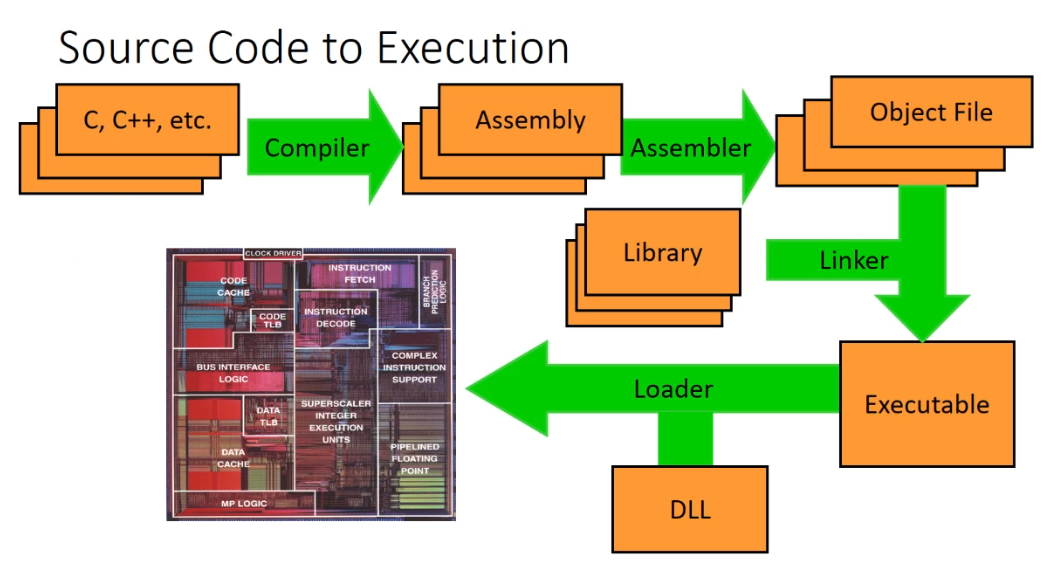
high-level languages 会先通过 compiler 转为 assembly,
assembly 再由 assembler 转为 object files
object files 加上 Libraries 再通过 linker 转为 exe
Object file format
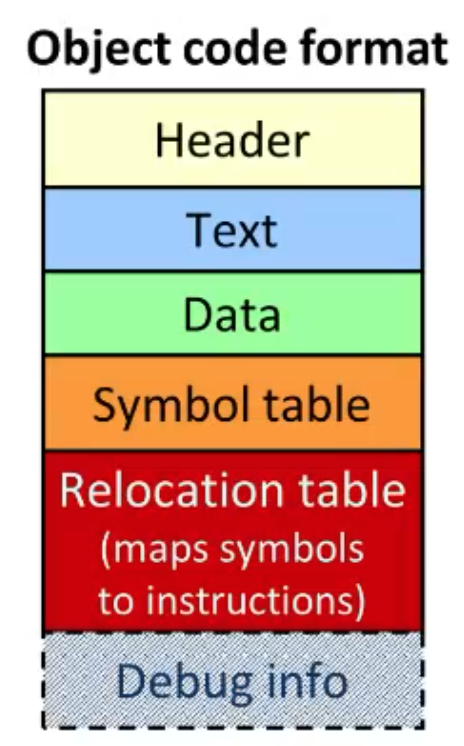
自上到下:Header, Text, Data, Symbol table, Relocation table 以及 Debug Info. Debug Info 只有在 compile with "-g" flag 的时候才被 included.
Note: object file 里面都是 machine code. 这里为了清晰使用 assembly 来直观代替.
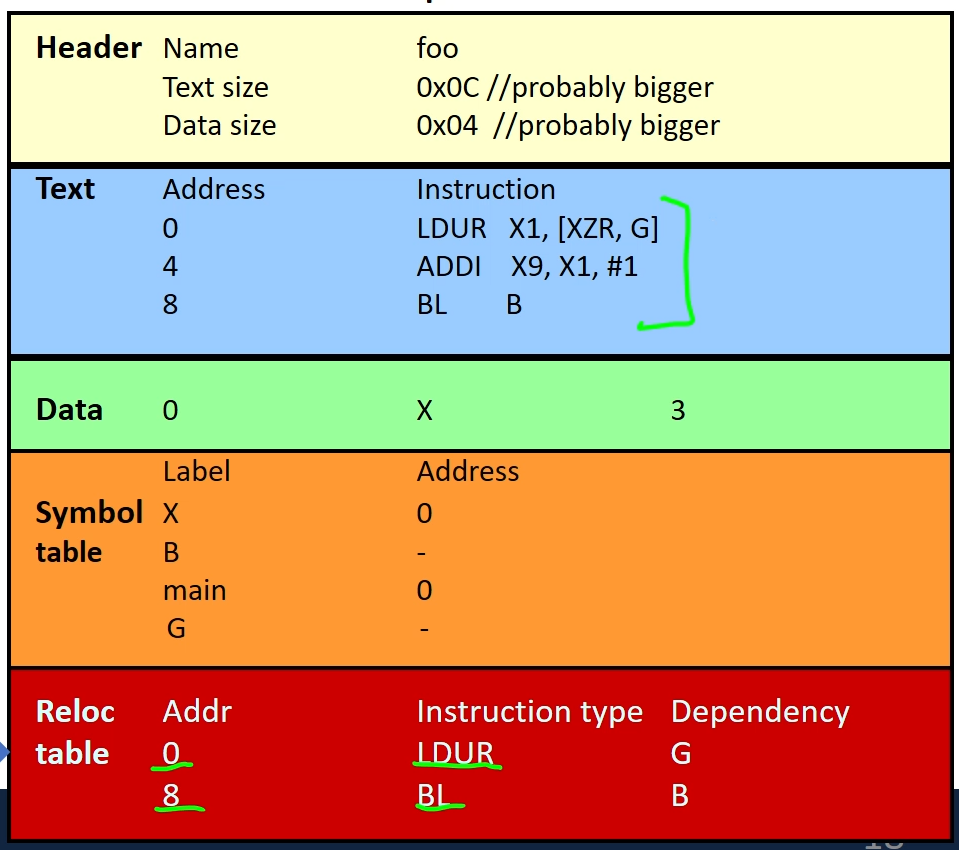
- Header: 用来 keep track of 每个其他 section 的 size
- Text: 就是这个 as 文件的 machine code
- Data: 相当于 LC2K 里面的所有 .fill
包含所有 initialized globals 和 static locals
Symbol Table
-
Symbol table: 列举了所有能够在这个这个文件外被看到的 labels. 比如 function names, global variables 等. 对于每个 symbol 我们都表明它的 section,比如 int a 在 data section,函数 foo 在 text section;至于 extern 的变量和函数的 section 我们则留 blank,在它们自己的文件里留 section
ex:
c extern void bar(int); // bar: extern extern char c[]; // c: extern int a; // a: global var int foo(int x) { // local var x, 并不 visible to 其他文件 int b; // local var b, 并不 visible to 其他文件 a = c[3] + 1; bar(x); b = 27; }symbol table (assembly 简记):
text a data foo text c - bar -
Relocation Table
-
Relocation Table: 列举所有当 things are moved in memory 时应该被 updated 的 instructions 和 data.
主要负责对全局变量和跨模块引用的函数进行重定位,而不处理局部变量(local variables)相关的指令,这是由局部变量的生命周期、作用域以及存储方式决定的
因为函数调用期间 local vars 被分配到 stack frame 上,在函数返回时被释放;所以 local vars 的地址是相对于 stack point 的偏移量,在 compilation 时可以确定,不需要 relocation
而每个函数都可以单独 assemble,对 global variables (data)以及对其他函数(code)的引用是跨文件的,因而 relative placement of code/data 在 compilation 阶段是未知的(在 linking 阶段才知道),编译器不知道它们的 absolute address,所以需要 relocation table 记录这些符号引用,在 linking 阶段再换为具体地址.
Relocation 需要做的:relocate absolute reference to reflect placement by the linker
(1) PC-relative 的 addressing (beq 等):never relocate.
(2) Absolute Address (mov 等): always relocate
(3) External Reference (bl 等):always relocate
(4) Data Reference (movz/movk 等):always relocate
ex:
(Note: c 中任何的 declaration 都不是一个 instruction. 只有给具体的 value,才会变成 instructions compile 进入 assembly 文件里. 所以)
extern int c[];
extern void B();
int X = 3;
int foo() {
    int b;
    X = c[3] + 1;
    B();
    b = 27;
}
变成 assembly 的部分是:
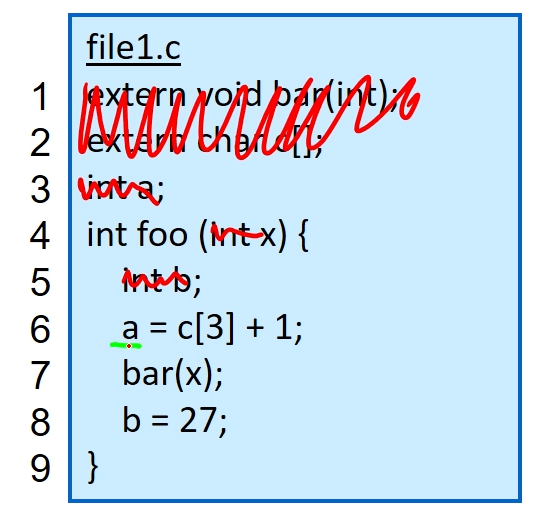
其中我们看到:
-
第 6 行是一个 load global var c,addition 和一个 store gloval var a 的操作
addition 不需要 relocation. load 和 store 的由于都是 global var 的,需要 relocation.
-
第 7 行是一个 function call,需要 relocation.
-
第 8 行是 load 和 store 一个 local var,在 stack 上,stackpointer 在 compilation 时确定,不需要 relocation.
所以 relocation table:
line	type	dep
6		LDUR	c
6		SDUR	a
7		BL		bar
Relocation table 仅仅只是 Used by assembler 和 linker 的,.exe 文件不包含任何 relocation info!
Linker: Stitch objs into a single .exe
在 assembly 把 .c 等等文件都做成 .o 之后,linker 把这些 .o 链接成一个 .exe 文件.
Note:Libraries 只是特殊的 object files.
Step:
- 把所有 .o files 的 text segment 放在一起
- 把所有 .o files 的 data segment 放在一起,并 concatenate 它到整合后的大 text segment 的后面
- Resolve cross-file references to labels. 确保没有 undefined labels.
Loader
.exe 文件被制成后被放在 disk 上
loader 负责把 .exe 文件的 code image 放进 memory,ask the OS to schedule it as a new process.
具体:
- create 一个新的 address space to hold text/data segment 以及 along with a stack segment
- 把 instructions 和 data 从 .exe 文件复制进新留出的 address space
- initialize regs (PC, SP等)