2 IDEs
2.1 VScode for Mac & WSL/Linux
2.1.1 Installation and Project Basis
2.1.1.1 Downloading VSCode for Mac
VSCode is a lightweight, easy-to-use, source code editor with debugging support.
It runs on macOS, Windows, and Linux (including CAEN Linux).
(1) Download on Mac
首先确保你下载了compiler and a debugger.
- MacOS默认的compiler是 Apple clang, 但是它用的是
g++的名字(怪). debugger用的是lldb.
至于具体怎么装我们实际上已经在install CLI tools的时候装过了. 我们通过 $ xcode-select --install 安装了夹带在xcode中的 Apple LLVM which pretends to be g++, 以及lldb debugger.
shell
   xcode-select --install
- 检查版本.
shell
   g++ --version
   # Apple clang version 13.1.6 (clang-1316.0.21.2.5)
   lldb --version
   # Apple Swift version 5.6.1 (swiftlang-5.6.0.323.66 clang-1316.0.20.12)
- 还有一件事,就是确保你的Mac版本在11.1以上.
shell
   sw_vers
   # ProductName:   macOS
   # ProductVersion: 14.2
- 安装VSCode
shell
   brew install --cask visual-studio-code
- 安装extension packages: C/C++ extension , CodeLLDB extension.
shell
   code --install-extension ms-vscode.cpptools
   code --install-extension vadimcn.vscode-lldb
list extension以确认.
shell
   code --list-extensions
(2) Download on WSL/Linux
- 同样,下载compiler和debugger. Windows/WSL中compiler用g++, debugger用gdb. 我们在安装CLI工具的时候也干过了. 原生linux也一样.
shell
   sudo apt install g++ gdb
- 检查版本.
shell
   g++ --version
   # g++ (GCC) 8.5.0 20210514
   gdb --version
   # GNU gdb (GDB)
- 安装VSCode
直接通过 https://code.visualstudio.com/ 安装.
- 安装WSL Extension,使得VS Code backend能够在WSL上运行(原生linux不用), which is where our installed g++ compiler lives.
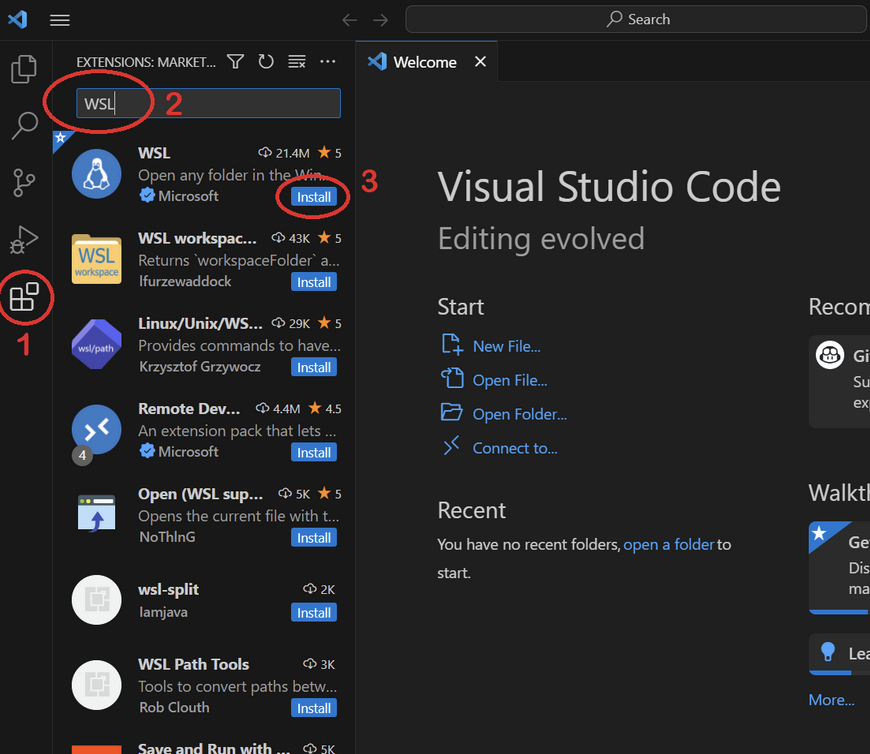
-
VS Code连接到WSL Ubantu. 首先点击左下蓝色图标,然后在跳出的 Command Palette(Ctrl+Shift+P) 选择"Connect to WSL". 选择完之后蓝色的图标会显示你在WSL Ubantu Mode下运行. (原生linux不用)

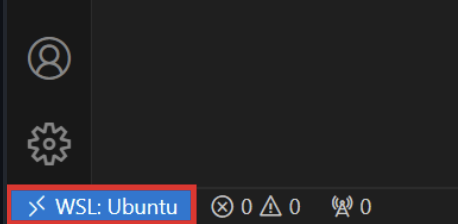
一定要确保在WSL下运行!! 如果accientally opened the folder in Windows Mode, 那么就点击Ctrl+shift+P打开Command Palette并选择"WSL: Reopen Folder in WSL". 同样,过程中如果跳出 "Unable to start debugging" 窗口也要 Reopen Folder in WSL.
-
在Sidebar中下载名字为 "C/C++"的extension.
2.1.1.2 Create a project and open it with VSCode
比如
mkdir ~/eecs280
cd ~/eecs280
mkdir p1-stats
cd p1-stats
Pitfall: Avoid paths that contain spaces. Spaces causes problems with some command line tools.
| Bad Example | Good Example |
|---|---|
EECS 280/ |
eecs280/ |
Project 1 Stats/ |
p1-stats/ |
a quick way to open VS Code to a specific project folder from the command line. 但是首先要用 ls 确认你现在在项目文件夹中.
ls
# main.cpp ...
code .
注意:如果你在使用WSL,那么你的项目应当创建在Ubantu下的directory中而不是Windows下的. 否则会slowdown running speed.
pwd
# /home/awdeorio ...         # Good, Linux home
# /c/mnt/Users/awdeorio ...  # Bad, Windows home
2.1.1.3 Create new files 创造新文件
先navigate to working directory,然后如下(例如,创建一个 main.cpp 的文件
touch main.cpp
2.1.1.4 Downloading from Internet and adding existing files 下载文件与添加现有文件
先navigate to working directory,然后这里是从网上下载文件压缩包,解压并移动到working directory一条龙.
wget https://eecs280staff.github.io/p1-stats/starter-files.tar.gz
## 从该网页下载
tar -xvzf starter-files.tar.gz
## 解压
mv starter-files/* .
## 把stater-files下所有文件移动到working directory
rm -rf starter-files starter-files.tar.gz
## 删除下载文件
2.1.1.5 Rename Files 文件重命名
mv 指令如果是move文件到文件,而不是到文件夹,意思就是重命名文件.
mv stats_tests.cpp.starter stats_tests.cpp
2.1.2 Compile and Run: 配置 launch.json 文件
2.1.2.1 Create .exe file
VSCode需要一个executable文件来compile and run. 也就是 .exe 文件. 我们通过command line创建一个.
touch stats.cpp
# Needed for EECS 280 p1
make main.exe
# make是Makefile的clt指令. 这个时候我们还没学makefile, 但是老师肯定会在Project tar里给你一个Makefile文件
./main.exe
# 跑一下. 需要代码能正常运行才能正常跑
如果你的老师真的没给你Makefile的话(逆天),那么你也可以创建一个.exe并compile manually.
g++ -g main.cpp -o main.exe
本质上就是只要compile main.cpp就可以了,其他的files都被linker通过header file给 include进了main.cpp.
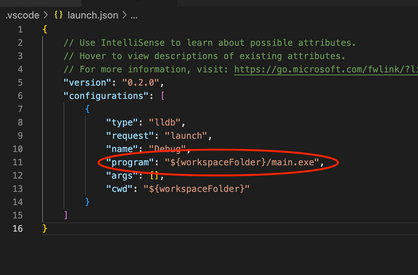
2.1.2.2 Create and edit launch.json
-
在左侧的 SideBar 中 navigate 到 “Run and Debug", 在其中点击 Create a launch.json file, 然后会跳出 Select debugger. 如果是macOS, 则选择
LLDB; 如果是WSL/Linux, 则选择C++ GDB/LLDB。 -
点击下方的 “Add Configuration". 然后WSL选择 "C/C++: (gdb) Launch". 注意不是Attach而是Launch. MacOS选择 "C/C++: (lldb) Launch"
-
更改
launch.json中的 "program" 为"{workspaceFolder}/main.exe". 前提是你的exe文件叫main.exe,总之就是运行你的exe文件. -
更改 "cwd" 为
"{workspaceFolder}"如果它不是.
```json { "program": "${workspaceFolder}/main.exe", ... "cwd": "${workspaceFolder}", }
```
- 如果出现未知的问题,delete your
launch.json并重新配置.
2.1.2.3 Run Project
确认了:
- makeFile文件已经配置好,
- 已经创建了
main.cpp并写完了main函数 (包括其他MakeFile配置中依赖的文件). - 然后已经用
make main.exe创建了可执行文件. - 已经配置好了
launch.json
然后就可以运行整个project了. Navigate到Run and Debug, 点击左侧上方的运行键就可以运行. 切记不是右侧上方的!
2.1.2.4 Configure input redirection 输入重定向文件的权限
在之前的CLT教程中,我们学习了怎么制作一个input redirection script来代替我们对程序进行脚本输入,以进行自动化. 比如:
./main.exe < main_test.in
# What's your name?
# Hello Drew!
但是我们还需要在 launch.json 文件中对其进行configure, 以允许其权限.
**For MacOS: **
{
    "configurations": [
        {
            ...
            "program": "${workspaceFolder}/main.exe",
            ...
            "stdio": ["main_test.in", null, null],
            // 这一行就是允许 main_test_.in 文件作为input redirection
            ...
        }
    ]
}
For WSL/Linux:
{
    "configurations": [
        {
            ...
            "program": "${workspaceFolder}/main.exe",
            ...
            "args": ["<", "main_test.in"],
            // 这一行就是允许 main_test_.in 文件作为input redirection
            // 注意Windows还需要加上redirection符号"<"作为参数, 允许使用redirection.
            ...
        }
    ]
}
(注意,如果是macOS,需要在 launch.json 中确认你在使用的是 lldb debugger. "type": "lldb". 如果因为各种奇怪的原因没有就加上.)
{
    "configurations": [
        {
            "type": "lldb",
            ...
2.1.2.5 Arguments and options
Arguments and options 就是写 command line 时 type into 的 inputs to a program.
比如:
./main.exe train_small.csv test_small.csv --debug
main.exe是 program名.train_small.csvandtest_small.csv是 arguments--debug是这一操作的 option.
意思就是要对 main.exe 这个program进行 debug 这个行为, 而其中的输入为 train_small.csv 和 test_small.csv.
那么我们就要更改 launch.json 进行congiguration来告知与允许这两个arguments和debug这个command line option. 我们找到 "configurations", 然后:
{
    "configurations": [
        {
            ...
            "program": "${workspaceFolder}/main.exe",
            "args": ["train_small.csv", "test_small.csv", "--debug"],
            ...
        }
    ]
}
每个option或者argument应该用string表示,comma-separated.
这一条里的东西 MacOS 和 WSL/Linux 是一样的.
2.2 XCode on Mac
2.2.1 Installation and Project Basis
2.2.1.1 创建并打开project
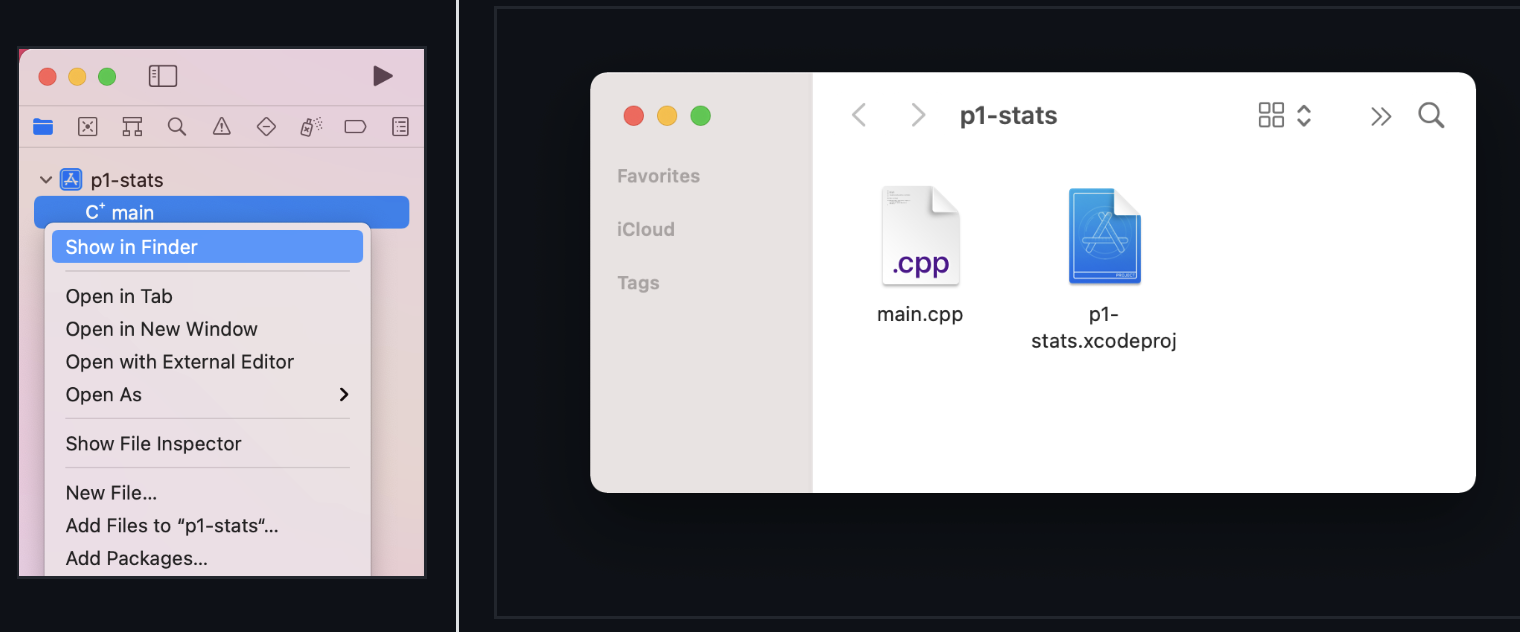
直接使用App Store安装. 创建Project的步骤是 Create a new Xcode projects -> Command Line Tool -> 填写project name, 选择语言为C++, 在“Organization Identifier” field 输入身份比如学校的项目写上 uniqname. 创建时记得勾选 Create Git repository on my Mac 以便于版本管理. 还是记得项目名不要有空格.
在working directory 打开project的快捷方法.
open p1-stats.xcodeproj
2.2.1.2 移动自动生成的 main.cpp
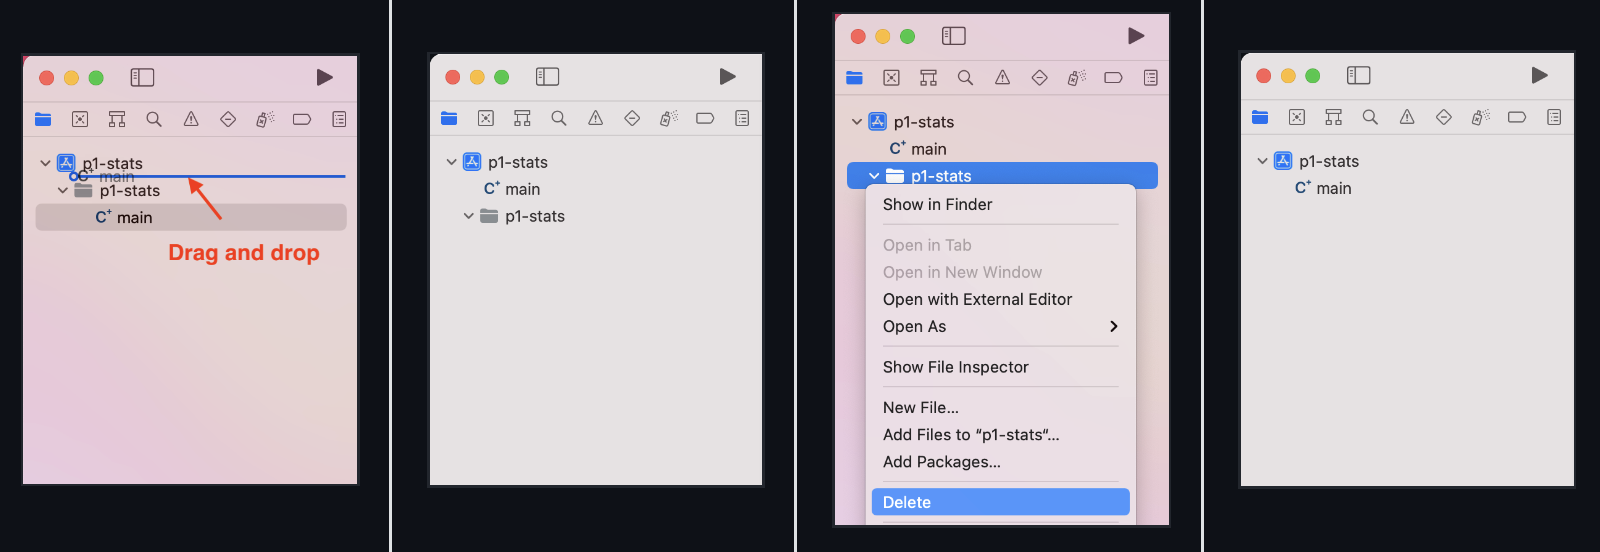
tree
.
├── main.cpp
└── p1-stats.xcodeproj
    ├── ...
2.2.1.3 Add new files
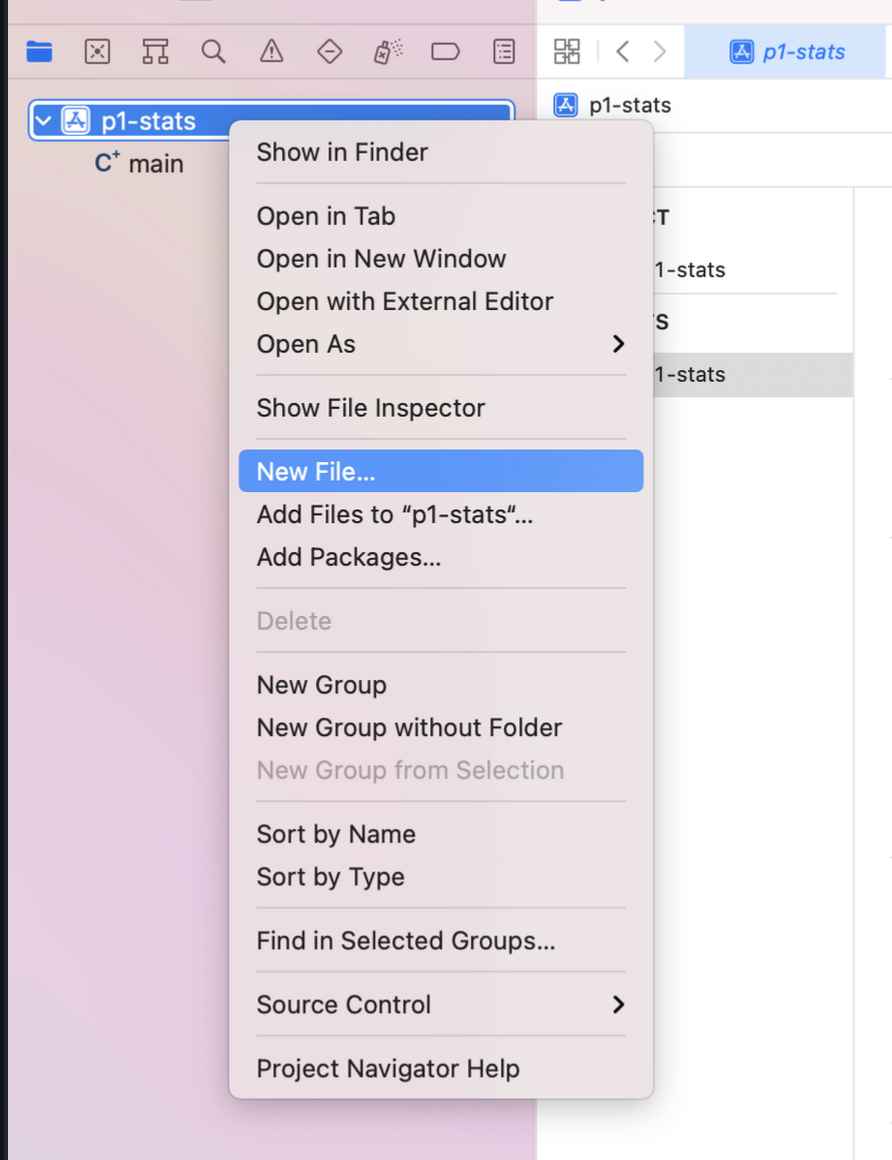
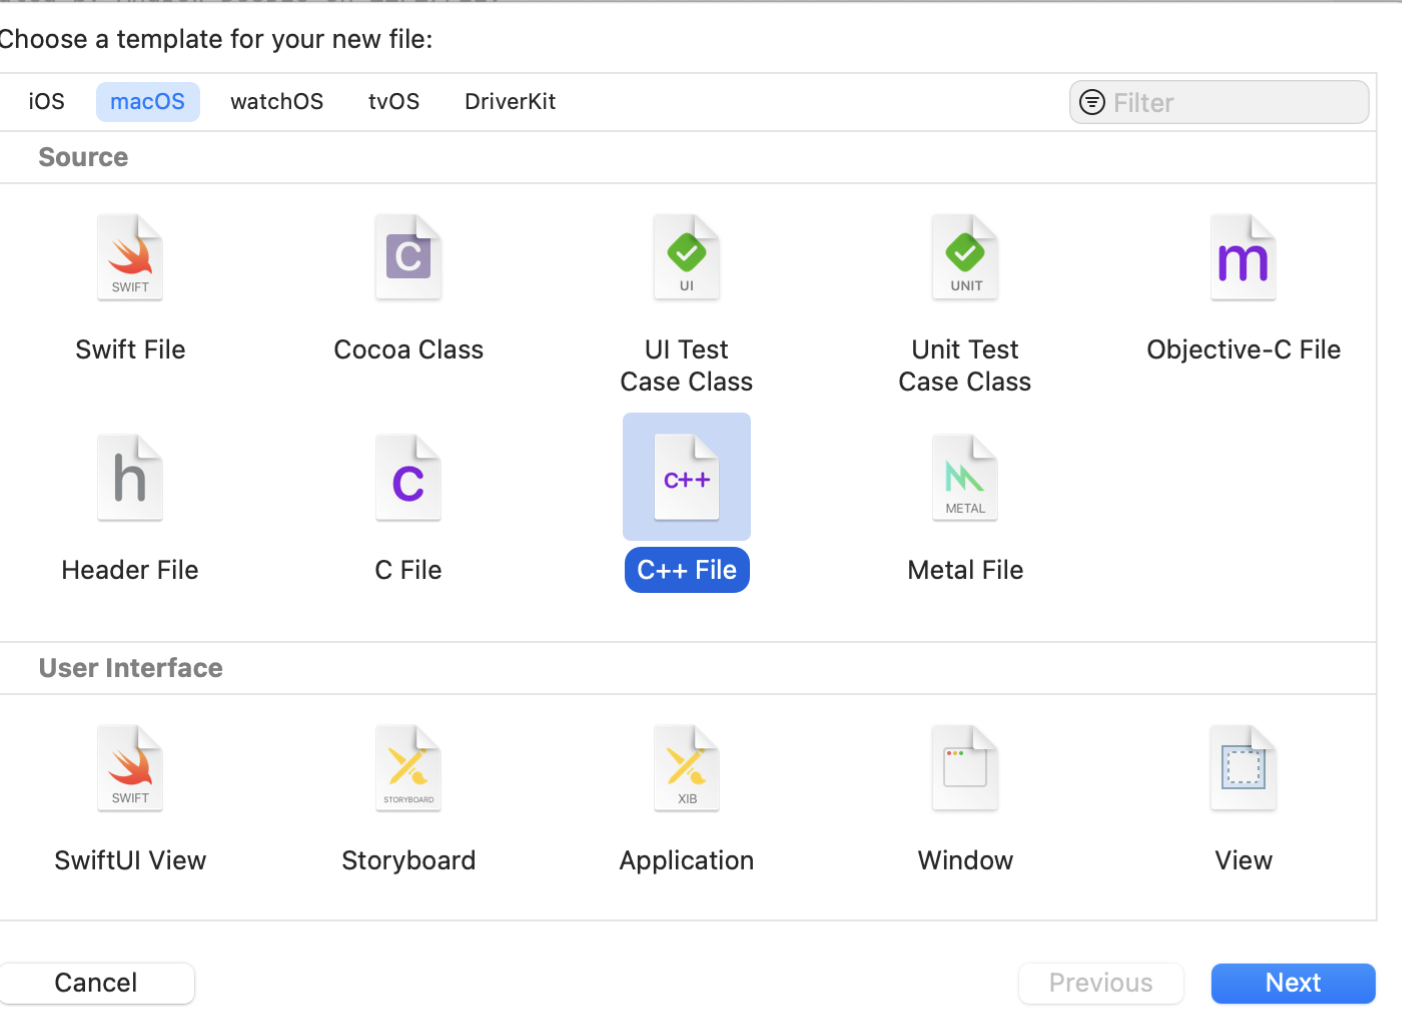
后面还会贴心地问你要不要also create a header file.
但是之后一页选择target时不要选择任何target.
You should see your new file in the sidebar.
2.2.1.4 下载文件与添加existing files
确保你在包含源代码的directory中.
ls
# main.cpp  p1-stats.xcodeproj
网络下载与解压文件并放到working directory下.
wget https://eecs280staff.github.io/p1-stats/starter-files.tar.gz
tar -xvzf starter-files.tar.gz
mv starter-files/* .
rm -rf starter-files starter-files.tar.gz
使用 tree 命令或者 ls 命令确认文件.
tree
.
├── Makefile
├── main.cpp
├── main_test.in
├── main_test.out.correct
├── main_test_data.tsv
├── p1-stats.xcodeproj
│   ├── ...
├── p1_library.cpp
├── p1_library.hpp
├── stats.hpp
├── stats_public_test.cpp
└── stats_tests.cpp.starter
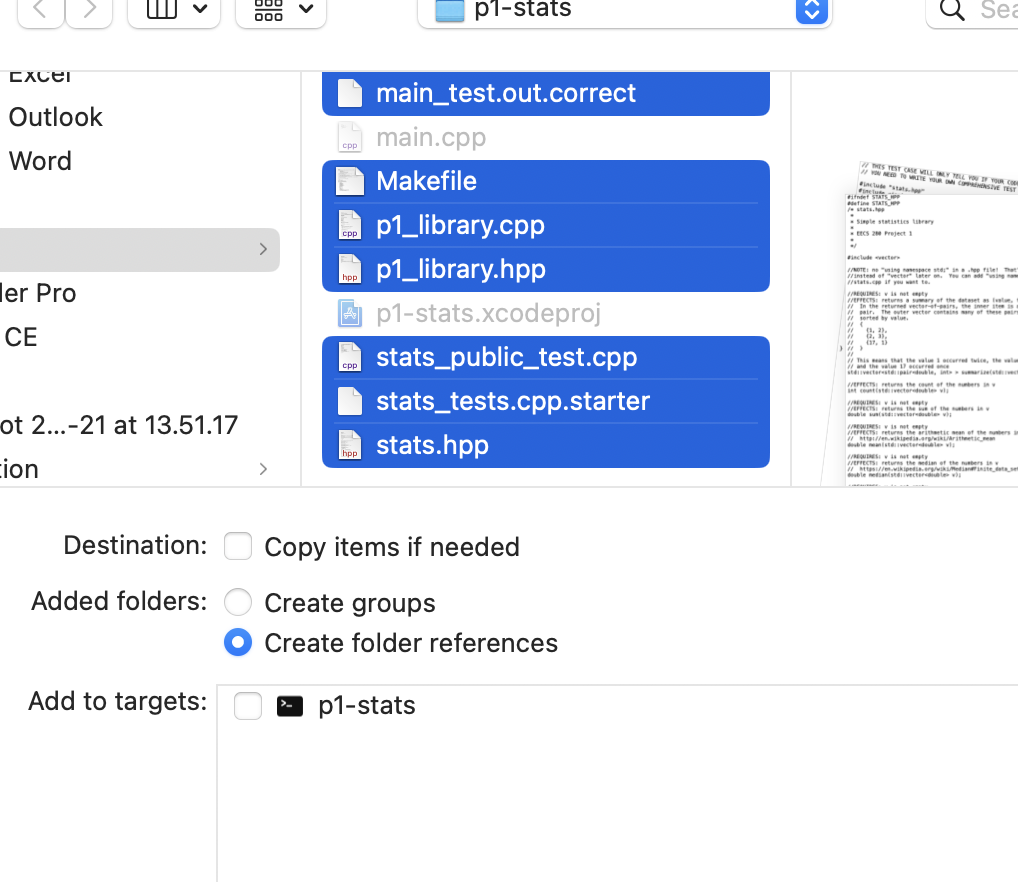
这个时候文件都在项目文件夹中,在侧边是看不到文件的. 点击文件图标并选择 Add Files to...
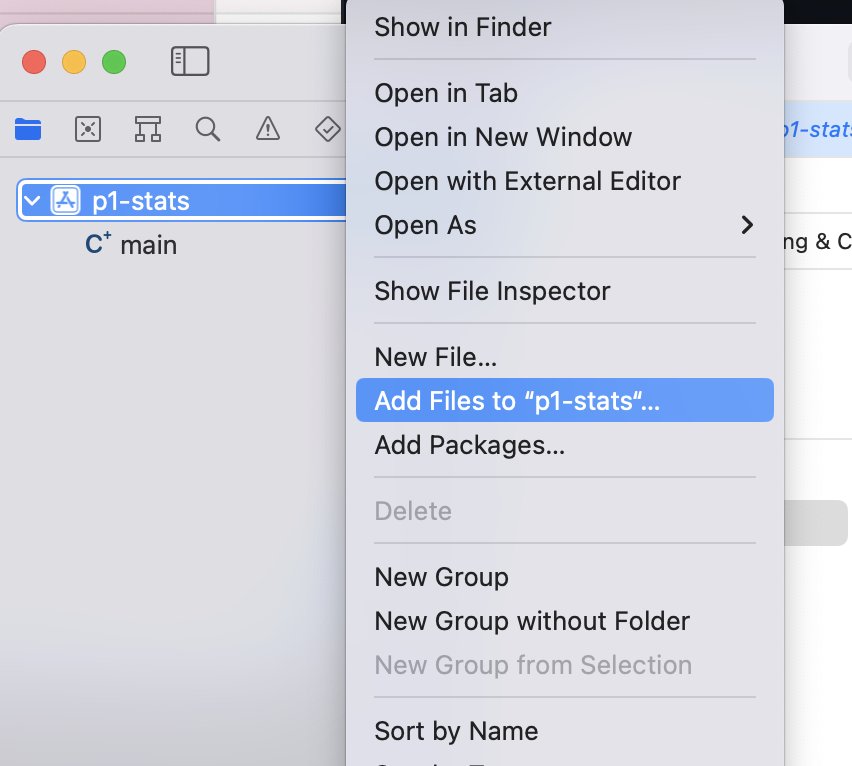
然后 command + a 选择所有文件,选择 Create folder references, 不要选择 Add to targets!
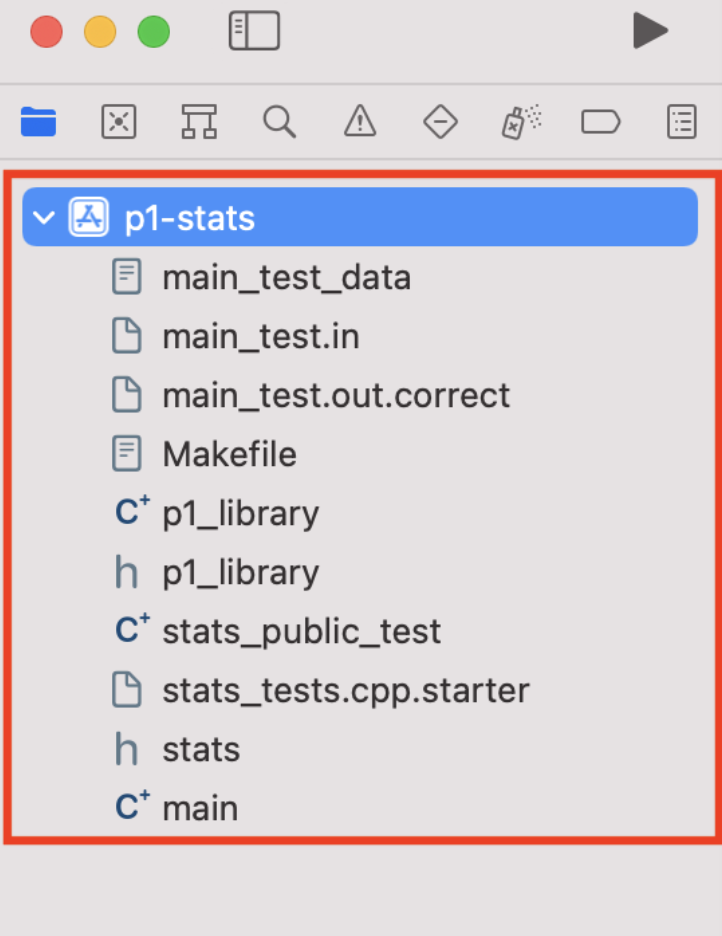
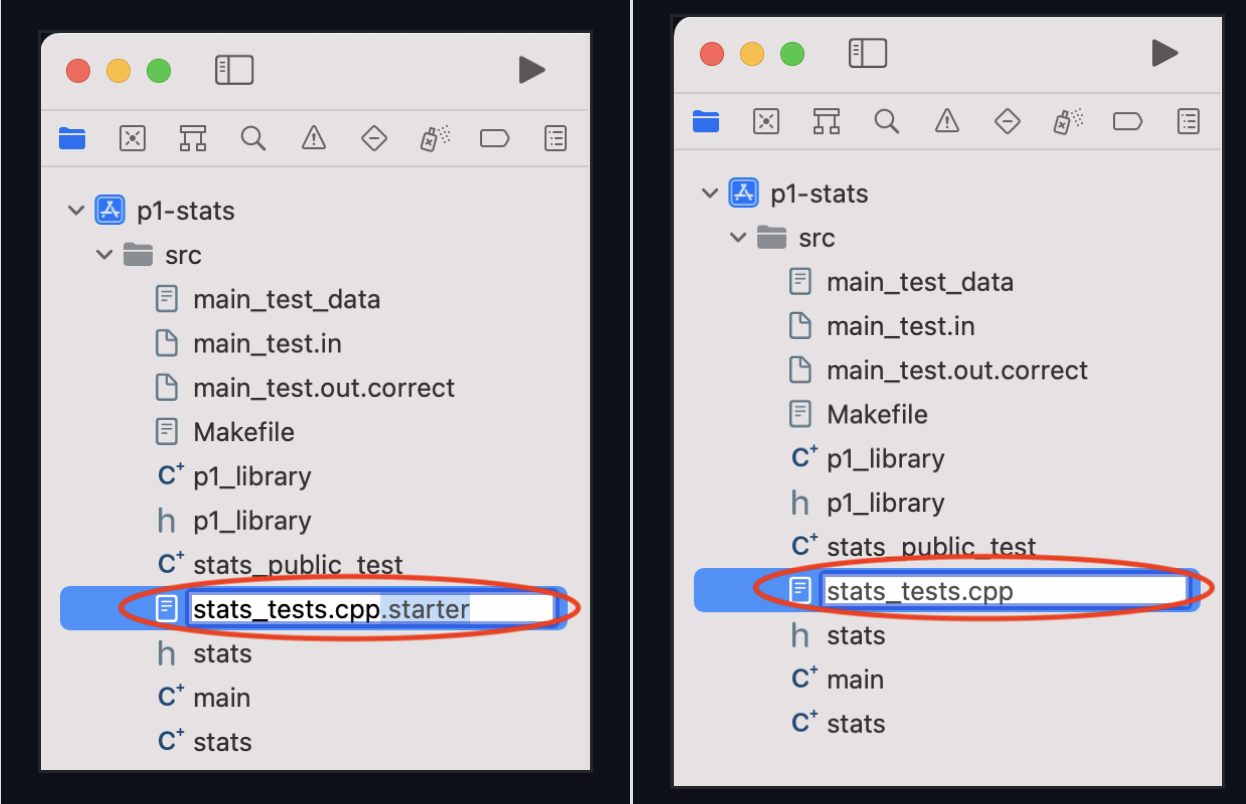
然后就可以在 Sidebar 看到文件了,说明成功了. 重命名文件直接在 Sidebar就可以操作.
2.2.2 Compile and Run
2.2.2.1 Include Files in a Build
一个 Xcode target compiles 一个 exe文件,这也是为什么刚才说不要把文件add 到 target 的原因.
你需要知道 which files to include in a build. Never include header (.h or .hpp) files!
Method 1: Include myfile.cpp each time you see #include "myfile.hpp".
Method 2: Include .cpp files used by your Makefile. In this example, main.cpp, stats.cpp, and p1_library.cpp.
make clean
make main.exe
# g++ -Wall -Werror -pedantic -g --std=c++17 main.cpp stats.cpp p1_library.cpp -o main.exe
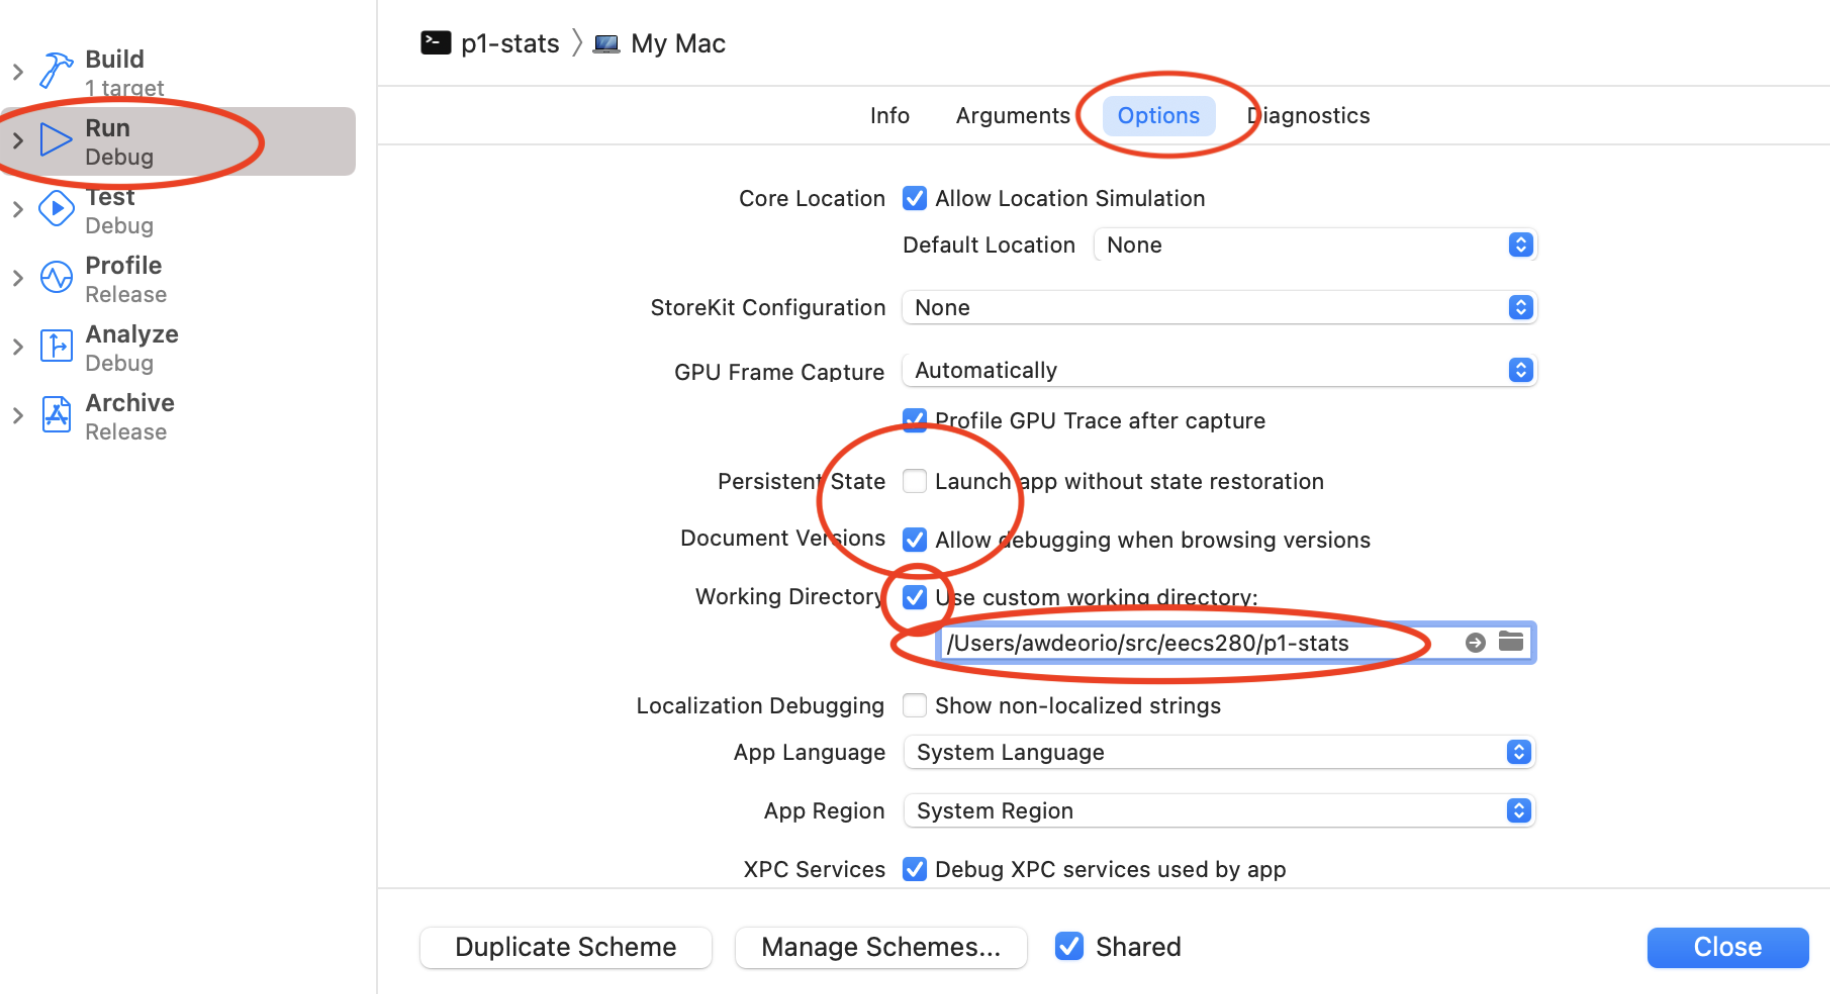
2.2.2.2 Edit Scheme 方案
配置 Xcode 以在包含input files的directory中运行exe文件!!
具体方法是
- menu:
Product->Scheme->Edit Scheme->Run->Options, thenUse custom working directory. 然后Browse to the directory containing your project’s files. 最后 ClickClose.
2.2.2.3 Input Redirection 输入重定向
XCode 并不支持 input redirection.
但是我们用一个 work-around 来把 input file 传入 cin,达到同样的效果.
Add these lines to the top of your main function. Your input filename may be different.
#include <cassert>
#include <cstdio>
//...

int main() {
  #ifdef __APPLE__
  assert(freopen("main_test.in", "r", stdin));
  #endif
  //...
如果要结束input redirection, 使用 comment or delete 把这几行去掉.
2.2.2.4 Arguments and options
和先前一样,Arguments and options 就是写 command line 时 type into 的 inputs to a program.
./main.exe train_small.csv test_small.csv --debug
main.exe是 program名.train_small.csvandtest_small.csv是 arguments--debug是这一操作的 option.
不过 XCode 不用通过 编辑 launch.json 文件来 configure Arguments and options.
我们直接menu: Product -> Scheme -> Edit Scheme -> Run -> Ariguments. 然后在其中加上每一个 option or argument separately.
2.3 Visual Studio on Windows
2.3.1 Installation and Project Basis
2.3.1.1 创建并打开project
安装 Visual Studio Community edition from Microsoft’s website.
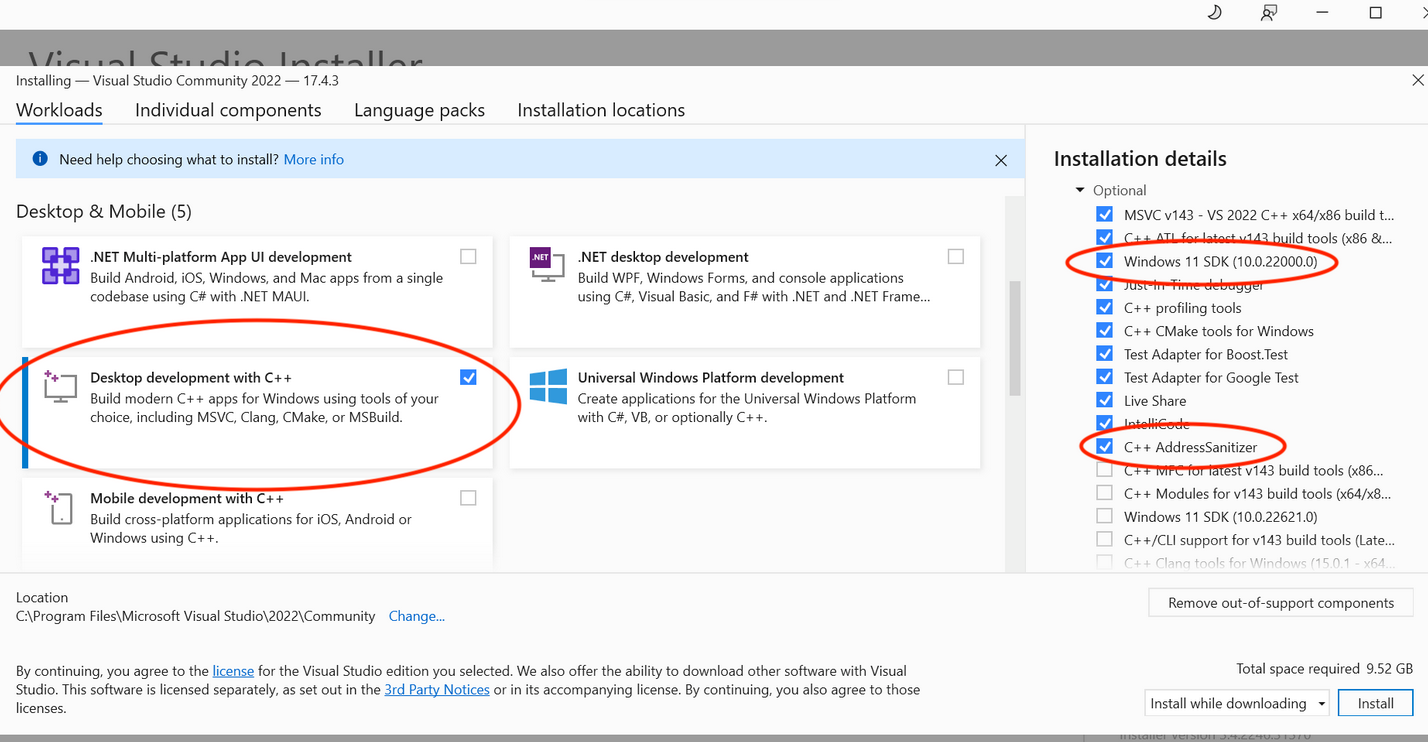
选择 Desktop Development with C++,并选择 Windows 10 SDK、Windows 11 SDK 和 C++ AddressSanitizer.
重启后,Create a new project -> Console App -> Set project name -> Pick a location for storage.
同样,project name不能有空格.
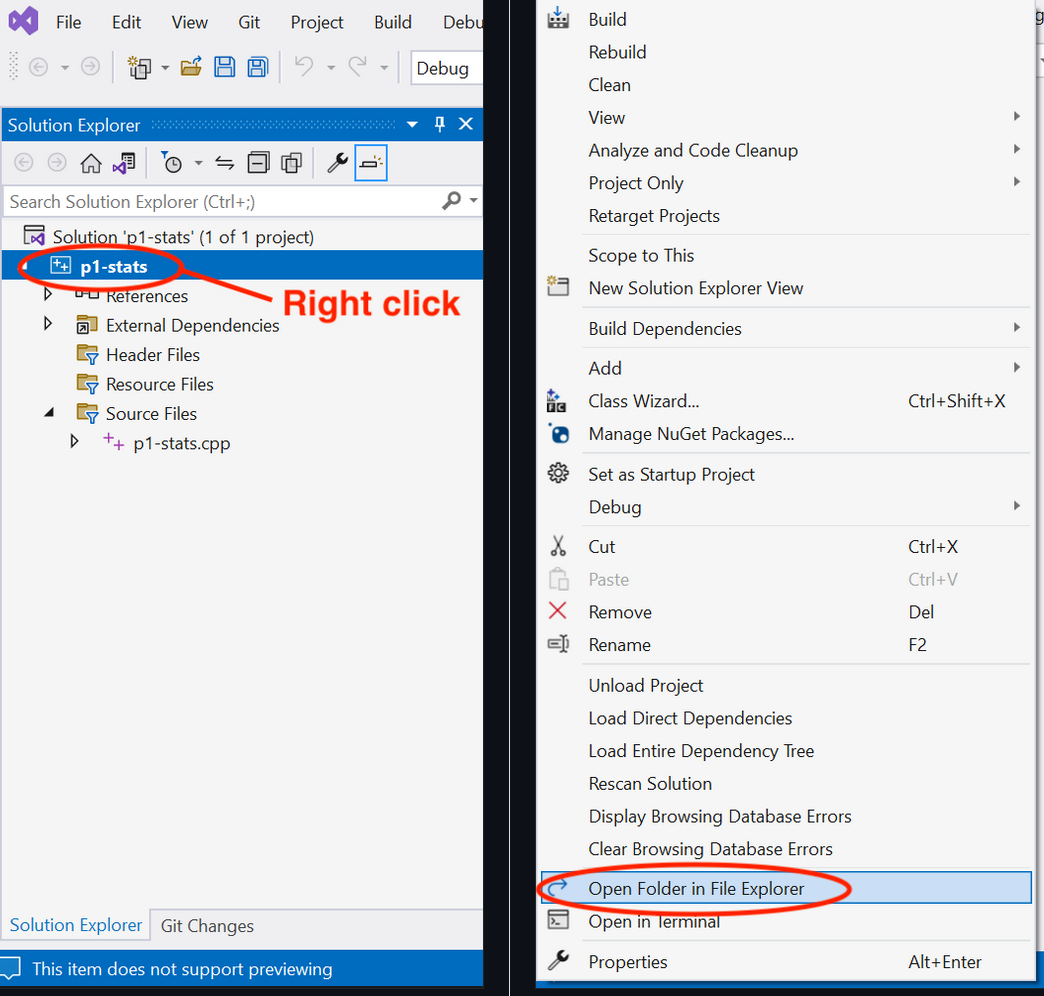
进入项目后,右击项目图标选择 Open Folder in File Explorer, 这就是我们的 working directory 了. 里面肯定会包含一个 sln 文件和一个 vcxproj 文件.
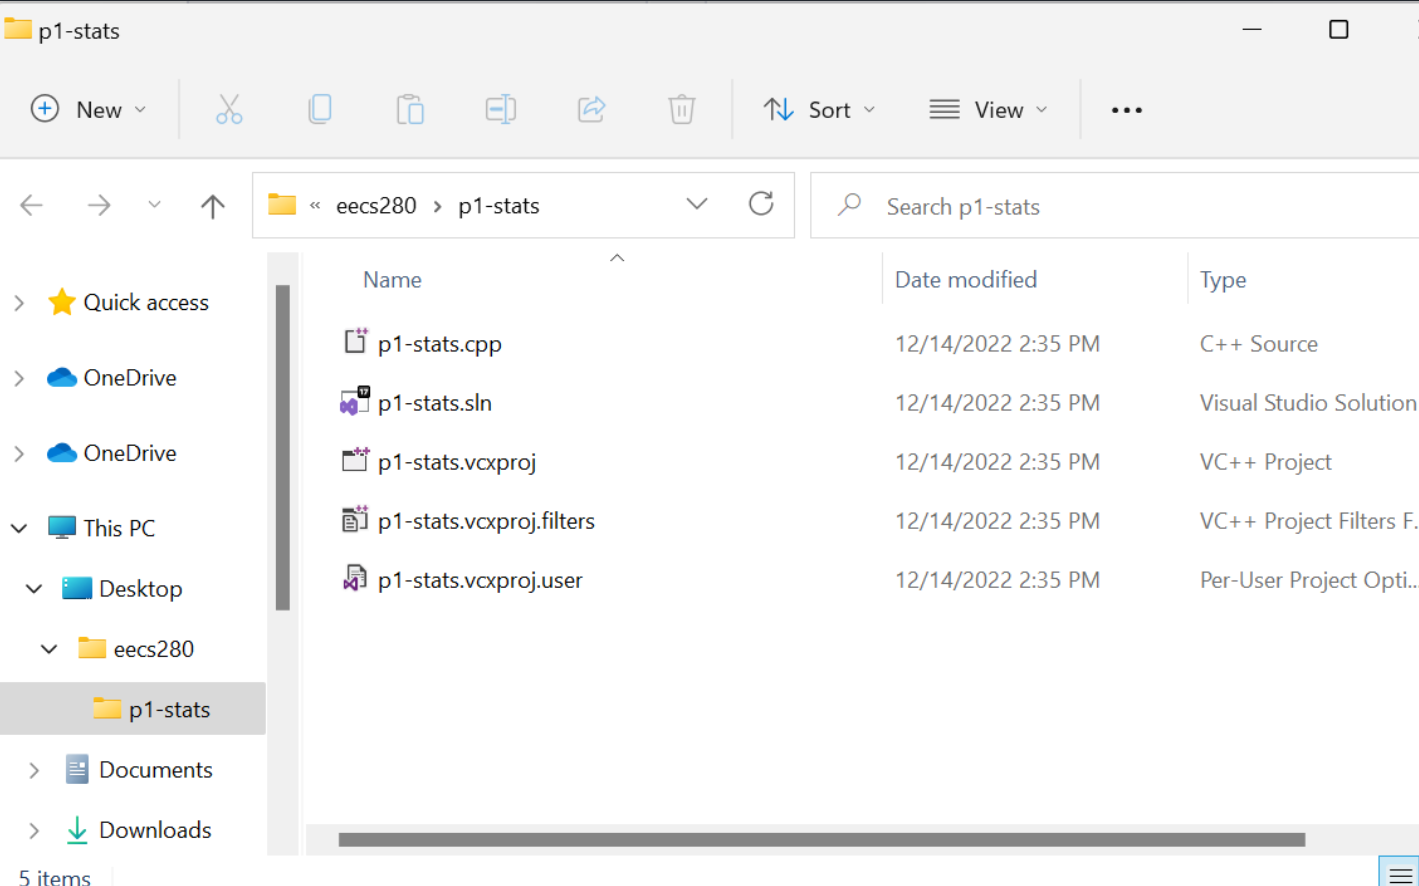
tree
.
├── p1-stats.cpp
├── p1-stats.sln
├── p1-stats.vcxproj
├── p1-stats.vcxproj.filters
└── p1-stats.vcxproj.user
重新打开项目就是:选择 File > Open > Project/Solution, navigate to your project directory (p1-stats in this example). 也就是我们刚才的 working directory.
2.3.1.2 Rename main.cpp file
我们创建的项目名会自动变成我们的第一个文件,但我们应该把它改成 main.cpp.

2.3.1.3 Add new files 添加新文件
右击 Source Files,选择 Add -> New Item. 输入文件名. You should see the new file under Source Files, 并且当你打开刚才说的 working directory, 也能看到该文件.
2.3.1.4 Downing and Adding Existing Files
首先 cd 到 working directory 并用 ls 确保你在其中.
和前面的 VSCode 与 XCode 一样,从Internet 下载文件并移入 working directory, 复制后移除.
wget https://eecs280staff.github.io/p1-stats/starter-files.tar.gz
tar -xvzf starter-files.tar.gz
mv starter-files/* .
rm -rf starter-files starter-files.tar.gz
然后使用 tree 或者 ls 检查:
tree
.
├── Makefile
├── main.cpp
├── main_test.in
├── main_test.out.correct
├── main_test_data.tsv
├── p1-stats.sln
├── p1-stats.vcxproj
├── p1-stats.vcxproj.filters
├── p1-stats.vcxproj.user
├── p1_library.cpp
├── p1_library.hpp
├── stats.hpp
├── stats_public_test.cpp
└── stats_tests.cpp.starter
右击 Source Files, then select Add -> Existing Item.
然后 navigate to your project directory. 通过按住 Control and clicking each one 来选择所有你需要的 files. Do not select any .sln or .vcxproj files. Click “Add”. 现在你可以在 Sidebar 中看见这些文件.
2.3.1.5 Rename Files 重命名
直接在 Sidebar 中重命名,这么做的同时也重命名了 working directory 中的文件.
2.3.2 Compile and Run
A Visual Studio Build compiles one .exe file.
2.3.2.1 Exclude files from build
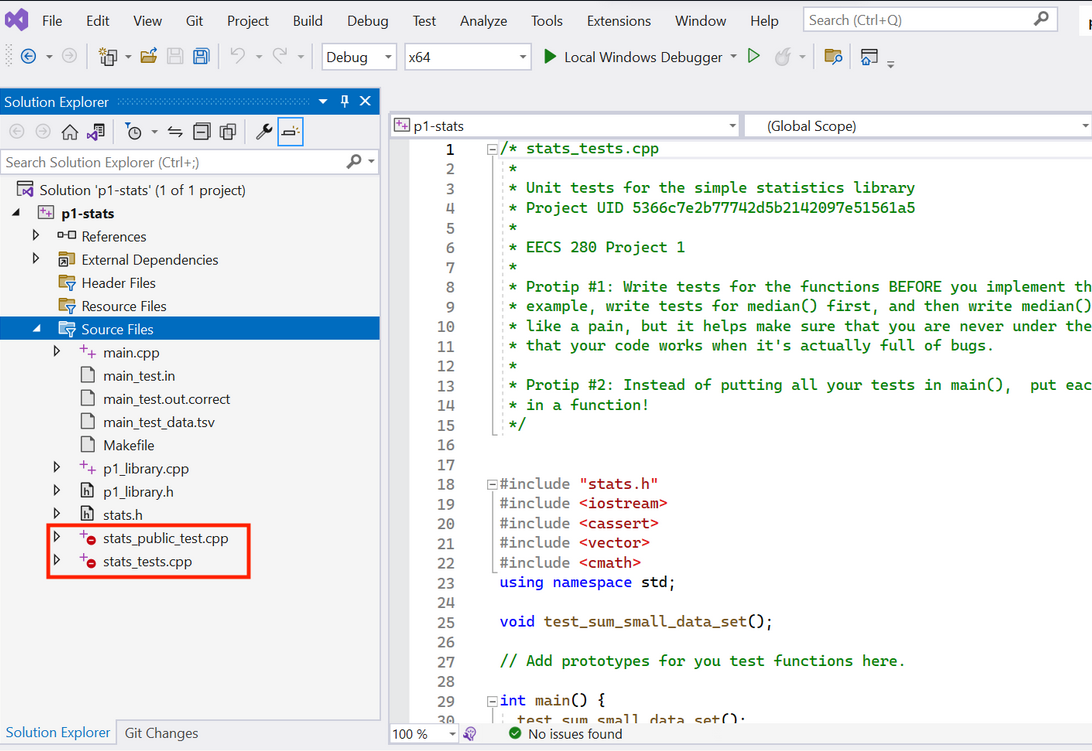
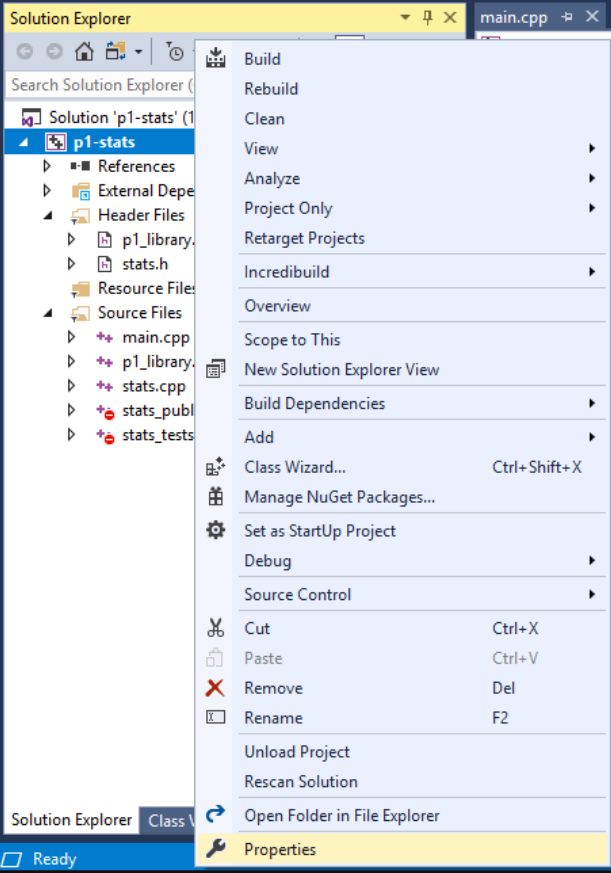
我们需要在同一个 build 中 avoid multiple main() functions. 因而我们需要 exclude files not needed to compile the main program.
意思是我们需要 exclude unit tests from the build 因为每个 unit test 都有一个 main() function.
具体做法是右击一个 sidebar中的文件,select “Properties”. 然后 Set “Excluded From Build” to “Yes”.
当我们这样设置了之后,Sidebar会显示出一个红色标识表示这个文件不在当前的 build 中.
2.3.2.2 Run project
Run 之前首先要 build. 也就是 compile.
点击 build solution, 确认 build output was successful.
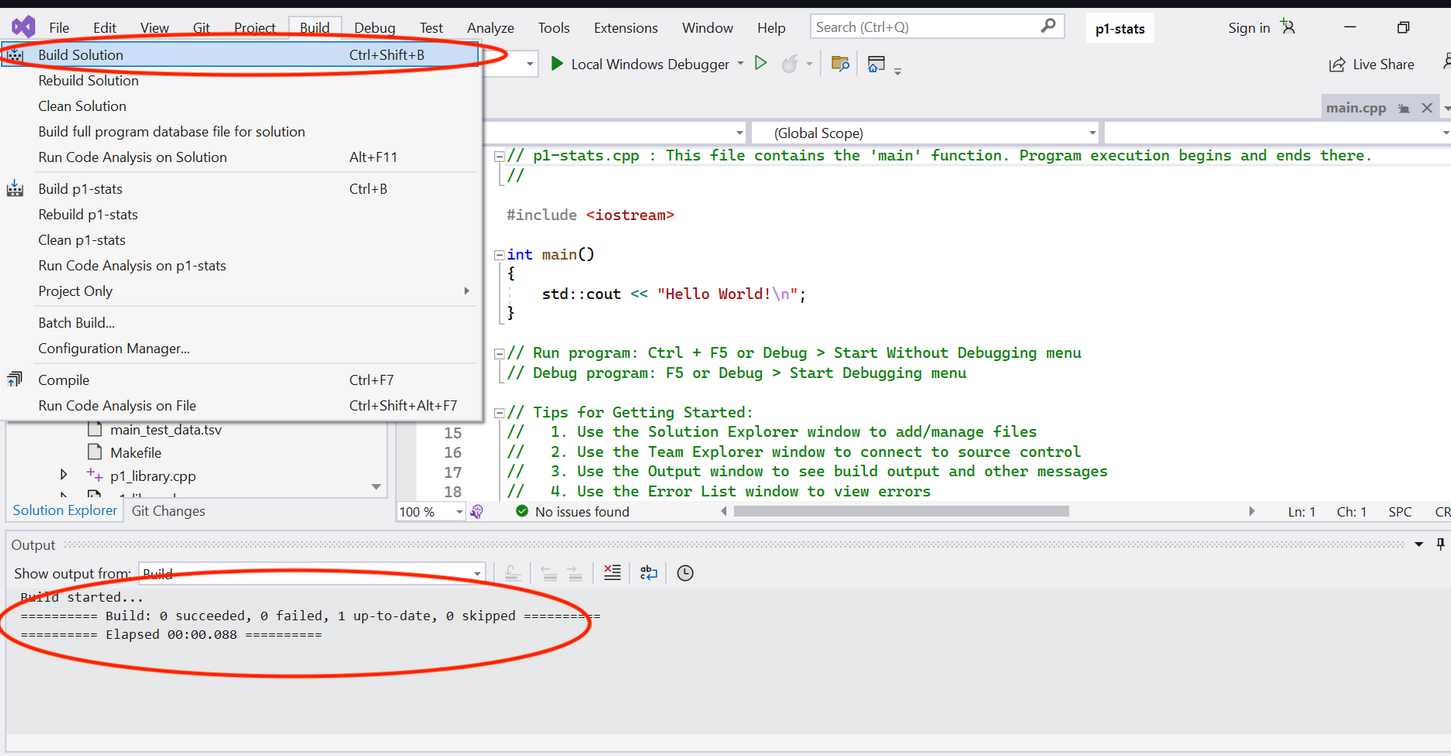
然后点击 Local Windows Debugger. Console就出来了,表示 run 好了.
2.3.2.3 Input redirection 输出重定向
右击 project 图标,选择 Properties.
选择 Debugging, 而后进入 Command Arguments. 将input redirection 符号 < 和输入文件名输进去.
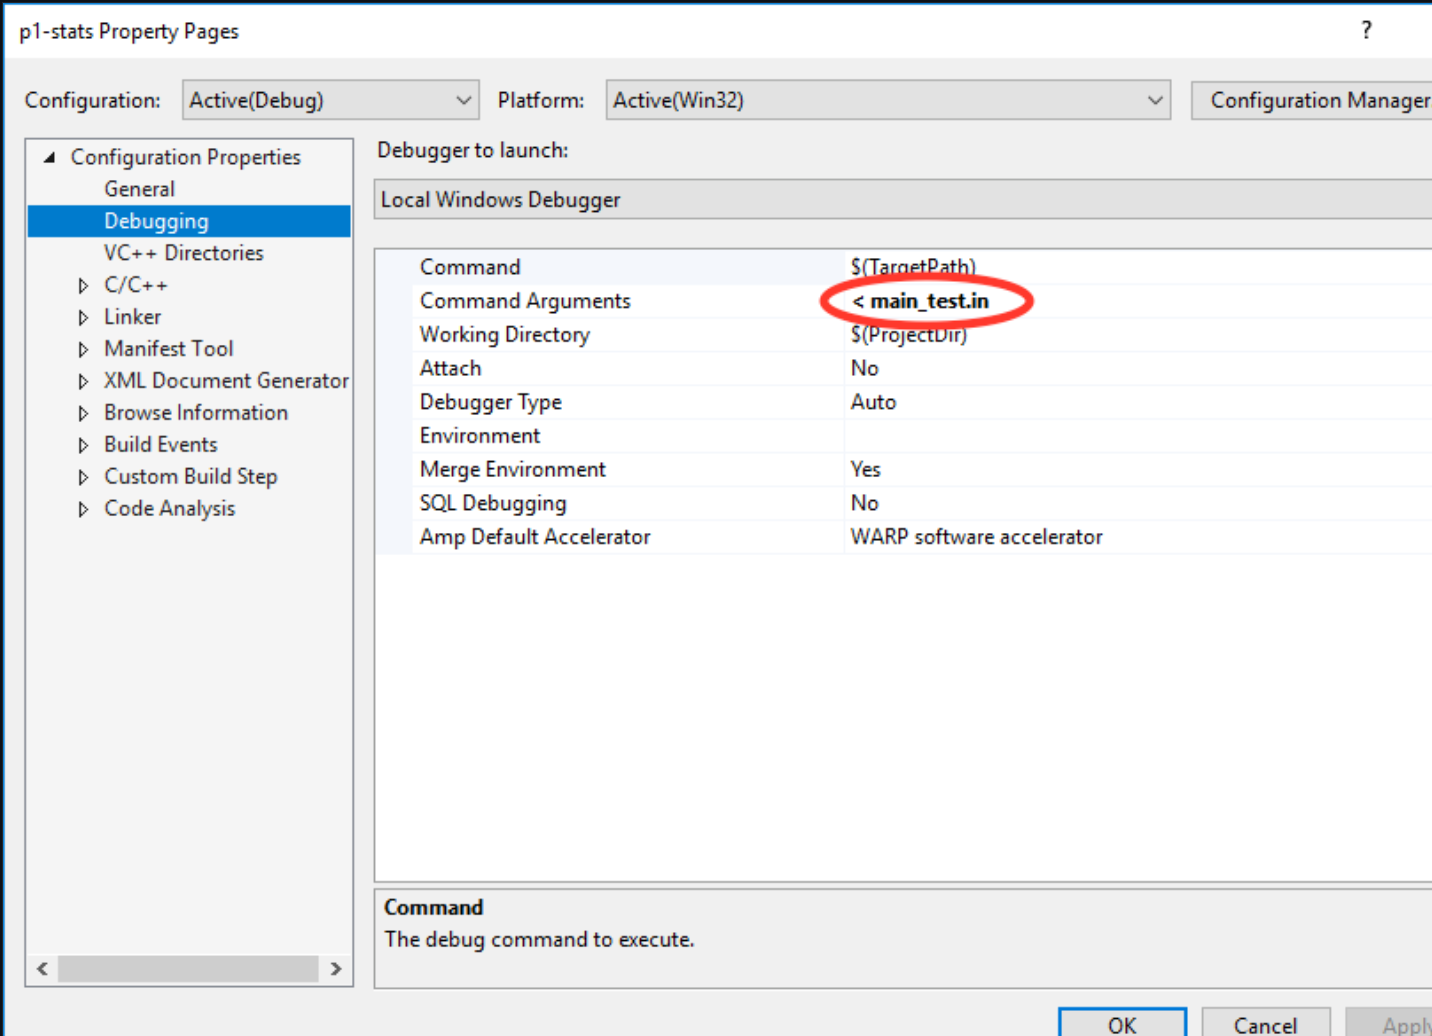
注意: With input redirection configured, Visual Studio 会自动 close the terminal window,你就看不见 output 了. 你需要在 main 函数的最后一行设置一个 breakpoint来keep the output window open.
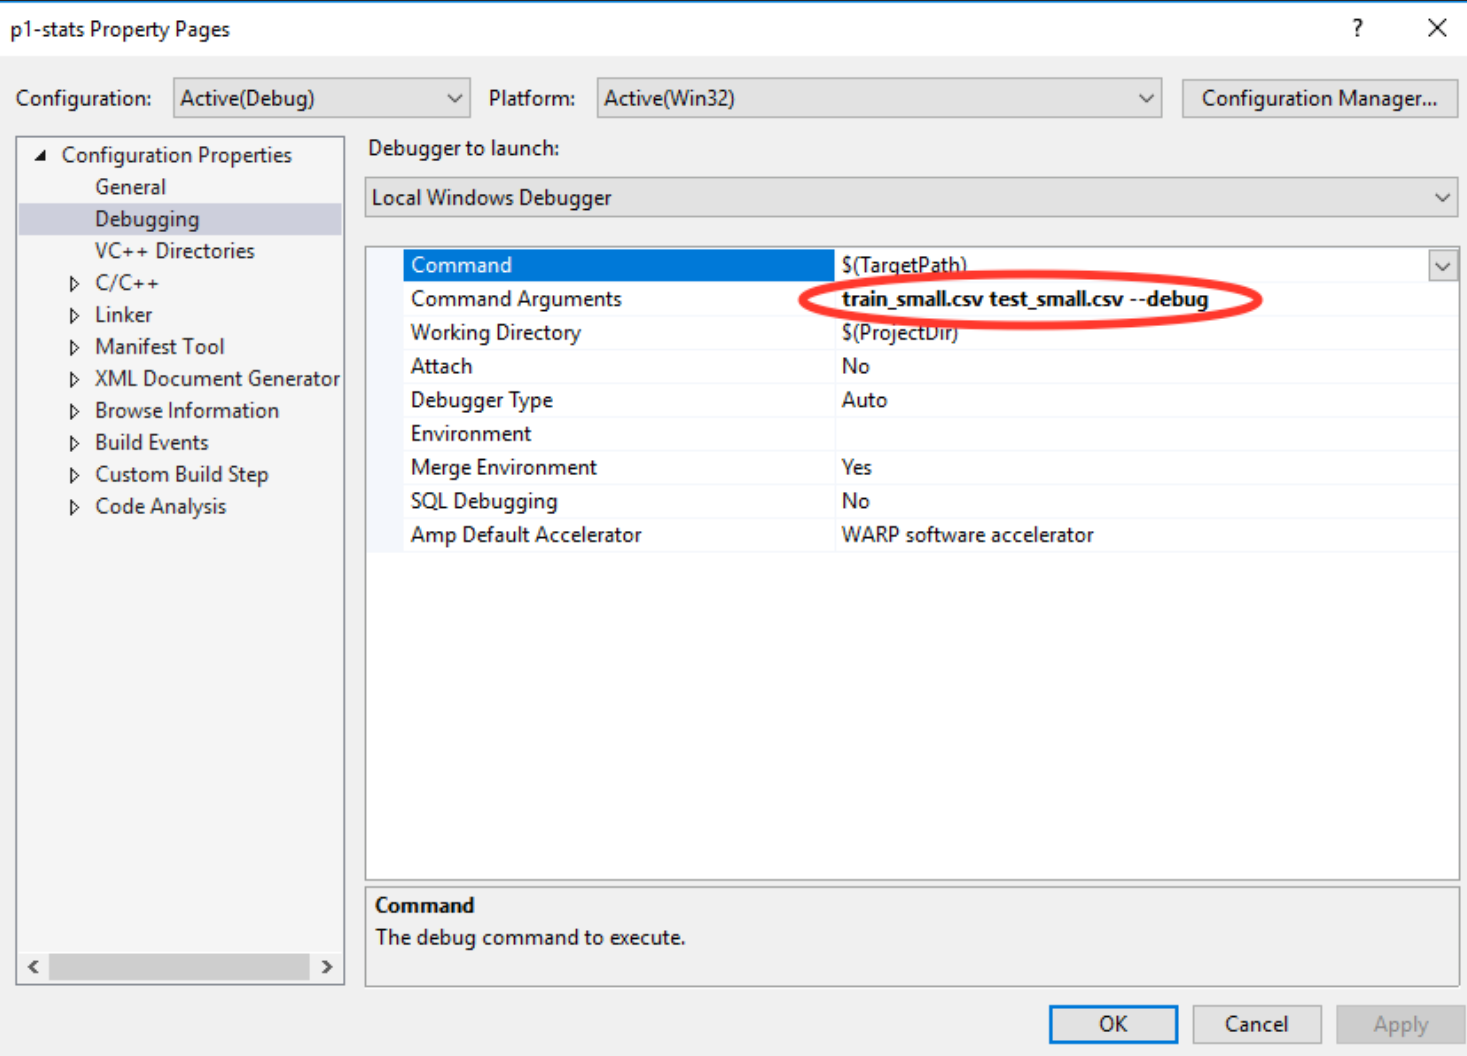
2.3.2.4 Arguments and options
和先前一样,Arguments and options 就是写 command line 时 type into 的 inputs to a program.
./main.exe train_small.csv test_small.csv --debug
main.exe是 program名.train_small.csvandtest_small.csv是 arguments--debug是这一操作的 option.
VS 也不用通过 编辑 launch.json 文件来 configure Arguments and options.
我们直接打开和 2.3.2.3 中同样的窗口,将arguments和option放进去.
比如:
2.4 Troubleshooting
2.4.1 VSCode
2.4.1.1 Reset
要重置 VS Code 的 project settings 和 starter files,首先要退出 VS Code,备份文件,然后删除 project directory.
pwd
cp -a p1-stats p1-stats.bak  # Backup all files
rm -rf p1-stats              # Delete the former directory
然后重新回到2.1创建project的环节.
如果你不是想重启项目而是想重置VSCode: (VS Code has a lot of settings and extensions. 你可以用下面的命令重置整个 user interface 并移除所有 extensions.This is optional. 注意这个东西改动非常大,这么做之前要想好.)
For Mac:
rm -rf ~/.vscode
rm -rf ~/Library/Application\ Support/Code
For Windows:
rm -rf ~/.vscode
rm -rf "/mnt/c/Users/awdeorio/.vscode" #把awdeorio换成自己用户名
rm -rf "/mnt/c/Users/awdeorio/AppData/Roaming/Code" #把awdeorio换成自己用户名
2.4.1.2 Compile and run
如果compile and run遇到问题,第一步最好是删除 launch.json,然后重新尝试compile and run.
2.4.1.3 Intllisense C++ Standard
Intellisense 是一种用红色斜线显示 compiler errors 并建议代码补全的功能. 但是如果 C++ 版本太低,你会在不该看到斜线的地方看到斜线.
首先,确保你已经按照2.1中要求经安装了 C/C++ 扩展。
然后,cmd(windows: ctrl) + shift + P 打开 Command Palette,搜索并选择 C/C++: Edit Configurations (JSON). 它会打开 c_cpp_properties.json 文件.
调整 cStandard and cppStandard settings in c_cpp_properties.json. 不要更改其他 se ttings.
{
    "configurations": [
        {
            ...
            "cStandard": "c17",
            "cppStandard": "c++17",
            ...
        }
    ],
    ...
}
2.4.1.4 C/C++ extension alternatives
Microsoft C/C++ extension 提供全平台的 debugging support and intellisense
CodeLLDB 提供使用 LLVM compiler 的debugging support. 适用于Mac.
clangd 提供 intellisense 但是需要 clangd language server, which is related to the LLVM compiler. 不要同时安装和启用 clangd 以及 Microsoft C/C++ , 因为多个 intellisense 可能会产生混乱的结果.
2.4.2 Xcode
To reset Xcode project settings and starter files, 首先退出 Xcode. 然后备份并删除原先的directory.
pwd
# /Users/awdeorio/src/eecs280
cp -a p1-stats p1-stats.bak  # Backup
rm -rf p1-stats              # Delete
然后回到2.2创建项目的环节重开.
如果你不是想重启项目而是想重置Xcode: 你可以使用下面的命令重置整个 user interface to the default settings. 没事别这么干.
defaults delete com.apple.dt.Xcode
2.4.3 Visual Studio
To reset Visual Studio project settings and starter files, 首先退出 Visual Studio. 然后备份并删除原先的directory.
/Users/awdeorio/src/eecs280
$ cp -a p1-stats p1-stats.bak  # Backup
$ rm -rf p1-stats              # Delete
然后回到2.3创建项目的环节重开.
如果你不是想重启项目而是想重置VS: 通过下面的方法,你可以重置整个 user interface to the default settings: 选择 “Tools” -> “Import and Export Settings” -> “Reset all settings”. 没事别这么干.