- 21 Linked List
- 21.1 Sequential Container ADT
- 21.2 Linked List
- 21.2.1 Based on chain of nodes 的 data structure
- 21.2.2 The IntList interface
- 21.2.3 Linked_List: Default Ctor
- 21.2.4 Linked_List: 获取最前方的 Node 上的值
- 21.2.5 Linked_List: push_front 在 list 首插入元素
- 21.2.6 Linked_List: pop_front 弹出 list 首元素
- 21.2.7 Linked_List: print 这个 list
- 21.2.8 Check the Big Three
- 21.2.8.3 operator=
- 21.2.9 Linked_list: insert 在 index n 插入一个 element
- 21.3 Doubly Linked List
21 Linked List
21.1 Sequential Container ADT
Sequential Containers 就是允许 sequential access of elements,即 traversal (遍历);以及保持 elements 的一定顺序的 Container ADT.
Sequential Containers 可以允许 random access via indexing (也就是形如 a[i]这种形式的 indexing),也可以不允许。
例子:Pixels in an image,sequence of characters in a file 等等
有一些比较经典的 sequential Container ADT,比如
- queue(队列): First In First Out
- Stack(栈): Last In First Out
21.1.1 Array-based Sequential Container ADT: contiguously 存储 elements
我们见过一些 based on array 的 Sequential Containers: 比如 vector.
Pro:
- Array 把 elements contiguously 存储在 memory 中,因而 based on array 的 sequential container 的一个好处是 indexing 非常快:因为
a[i]也就是*(a+i),index 的 time complexity 为 $O(1)$.
Con:
但是 based on array 的 Sequential Containers也有一些坏处。
- 当
size == capacity时我们想要让这个 array “grow",也就是新建一个 capacity 更大的 dynamic array 并把原 array copy 进去。这花费的 time complexity 为 $O(n)$. - 如果我们想要 elements 保持 sorted order,那么每当我们给 dynamic array insert 新的元素或者 remove 元素时,我们都要进行一个
shift的操作(复制 dynamic array,将指定位置之前/之后的元素向左/向右 shift 一个单位),这个操作的 time complexity 为 $O(n)$.
21.1.2 Non-contiguously 存储 elements: 使用 node
如果我们要经常插入元素,但是却很少 indexing,那么我们可以考虑另一种 trade off: 采取一种 non-contiguous 的存储方式.
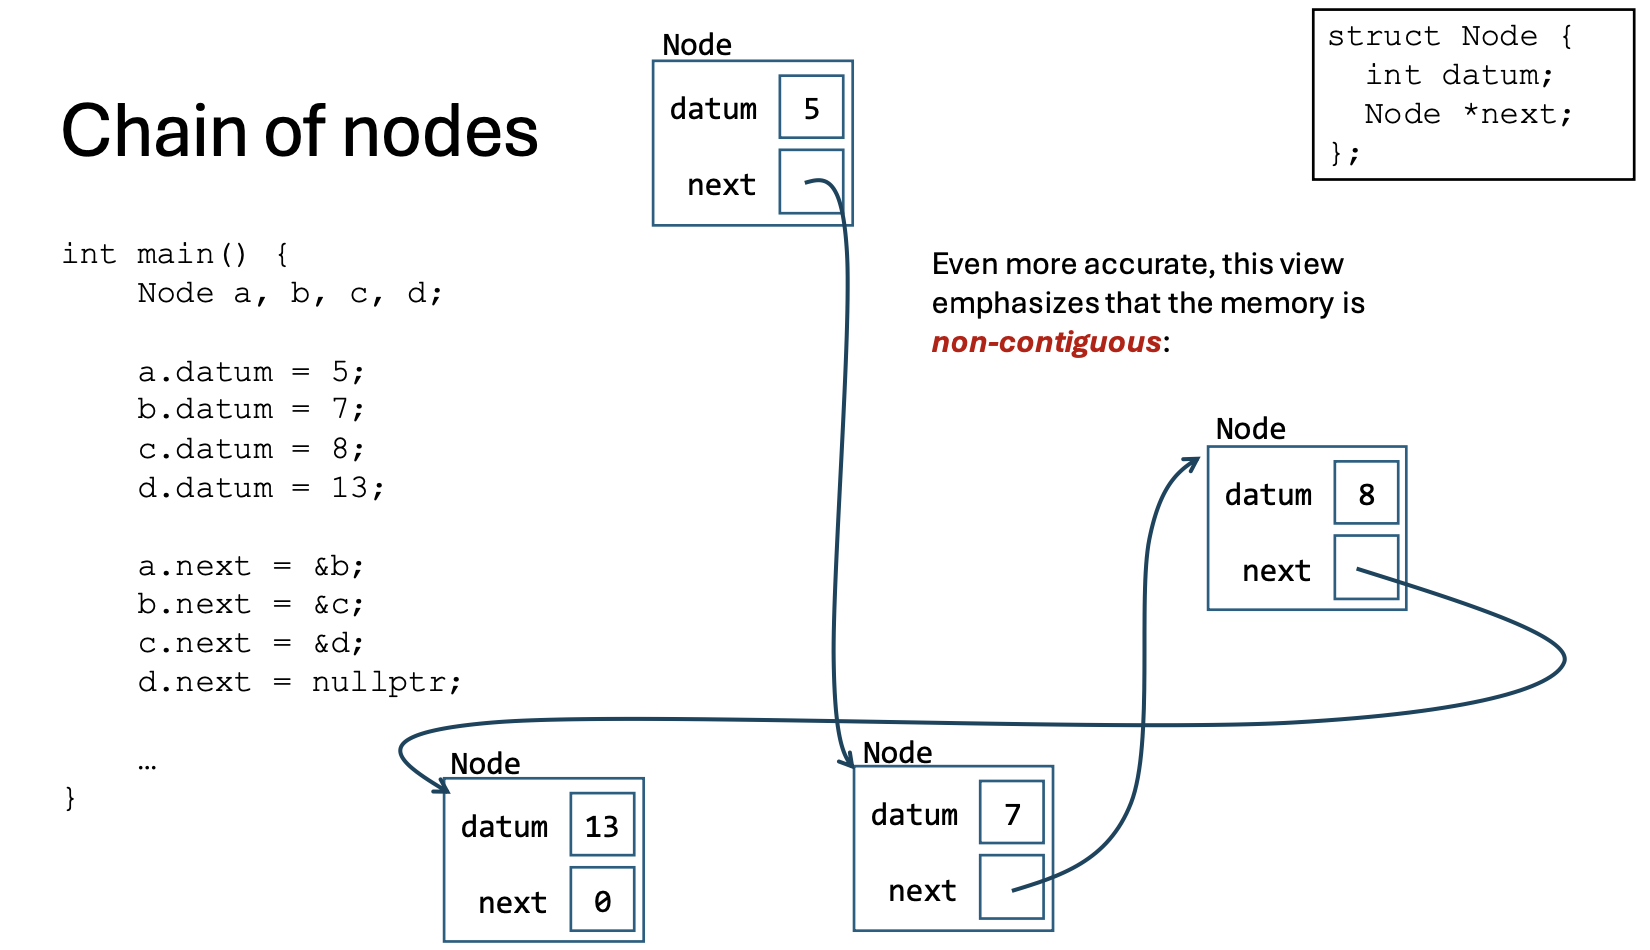
下面是一个 Node 结构:
struct Node {
    int datum;  // 一个 element
  Node *next;   // 一个 pointer to next element
};
我们可以将这个结构作为我们 implementation 的基础。一个 Node 由一个 datum (即这个Node上的元素) 以及一个指向下一个 Node 的 pointer 组成。
这样,我们就能做到快速的 insert 和 remove: 想要 insert/remove 一个元素,只要更改上一个/下一个 Node 的 next 就可以,time complexity 为 $O(1)$. 并且,我们将不再需要 grow 这个 container.
但是快速的 insert/remoe 换取的代价是:indexing 将变慢,不得不使用 loop 来进行 traversal.
21.2 Linked List
21.2.1 Based on chain of nodes 的 data structure
有了这个 Node 结构,我们可以构造出一个新的 Sequential Container ADT: linked list. 我们称这种用 nodes 而不是 array 来实现的 Sequential Container ADT 为 based on chain of nodes 的 data structure.
template <typename T>
struct Node {
  T datum;
  Node *next;
};

template <typename T>
class Linked_List {
private:
  Node *first;
  //...
}
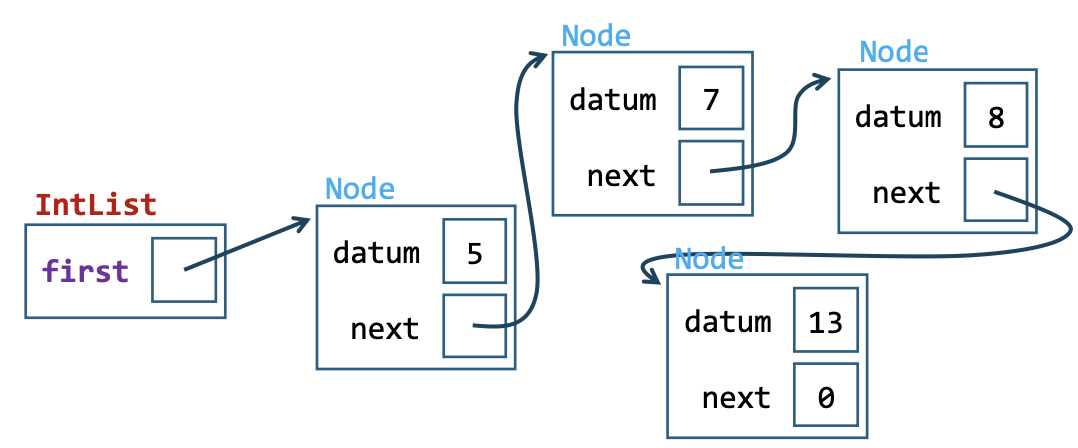
Representative Invariants:
-
first可以是nullptr(对于一个 empty linked list) 也可以 points to a validNode. -
在最后一个 Node 中,
next总是nullptr. -
除了
first与最后一个 Node,其他Nodes都必须 points to 另外一个Node.
没有 cycle.
21.2.2 The IntList interface
template <typename T>
class List {
public:
  // EFFECTS: constructs an empty list
  List();
  List(const List &other);
    ~List();

  List & operator=(const List &rhs);

  // EFFECTS: inserts datum at front of list
  void push_front(T datum);

  // REQUIRES: the list is not empty
  // EFFECTS:  Returns (by ref.) first element
  T & front();

  // REQUIRES: the list is not empty
  // EFFECTS:  removes the first element
  void pop_front();

  // EFFECTS: returns true if the list is empty
  bool empty() const;

  // EFFECTS: Inserts datum at index n in the list
  void insert(T datum, int n);

  void print(std::ostream & os) const;

private:
  struct Node {
    T datum;
    Node *next;
  };
  Node *first;

  // EFFECTS: removes all nodes from the list
  void pop_all();

  // REQUIRES: this list is empty
  // EFFECTS: copies all nodes from the other list
  //          to this list
  void push_all(const List &other);
};
现在 Node 作为一个 implementation detail,只能在 IntList 内部使用。
我们需要隐藏这些 mplementation details,也就是 encapsulation(封装).
21.2.3 Linked_List: Default Ctor
默认创建的是一个 empty linked liest: 于是只要把 first initialize 为一个 nullptr 就可以了。
template <typename T>
List<T>::List()
  : first(nullptr) { }
于是附上一个判断这个 linked_list 是否为空的函数。
template <typename T>
bool List<T>::empty() const {
    return first == nullptr;
}
21.2.4 Linked_List: 获取最前方的 Node 上的值
我们返回 T &,意思是我们既可以用它来获取 Node 上的值,也可以用它来更改 Node 上的值。
template <typename T>
T & List<T>::front() {
    assert(!empty());
    return first->datum;
}
21.2.5 Linked_List: push_front 在 list 首插入元素
我们如果想把一个值插入到 first 的后面:
首先我们应该 new 一个 Node 并 copy 我们想传进去的值进入这个 Node,让这个 Node 指向 原本的首元素,也就是把 first 的值传给它;
然后我们应该把 first 更改为指向这个 Node.


template <typename T>
void List<T>::push_front(T datum) {
  Node *p = new Node;   // new 一个新 Node
  p->datum = datum; // 给 Node 赋值
  p->next = first;  // 让 p 指向原本的首元素
  first = p;    // 让 first 指向 Node
}
注意,这个顺序是不能改变的。比如如果先让 first 指向 Node,再让 p 和 first 指向同一个元素,那么我们床就创造出一个一个指向自己的 Node.
21.2.6 Linked_List: pop_front 弹出 list 首元素
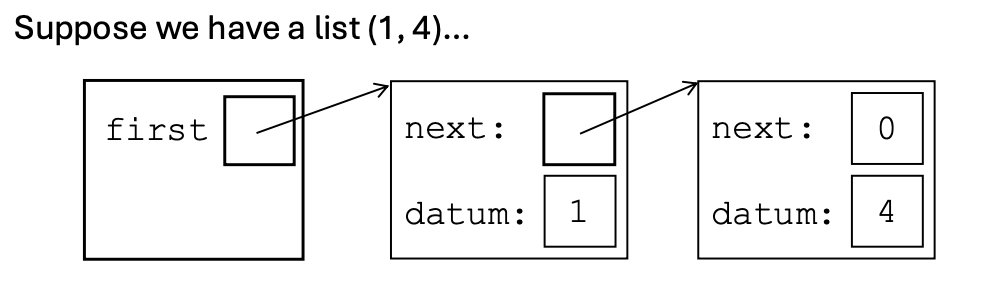
首先,我们确保 list 现在并不是空的。
然后,我们创建一个 ptr name 叫 victim,让它指向 first 指向的,也就是 list 首元素。这一步是为了等下让 first 指向原来的第二个元素后仍然有办法 access 原来的首元素,防止 memory leak.
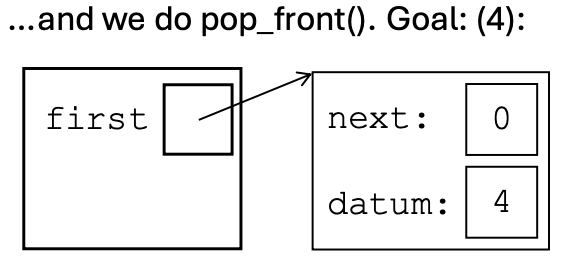
然后让 first 指向原来的第二个元素,也就是现在的 first 指向的首 Node 的 next .
然后 delete victim 指向的原来的首元素。完成。
template <typename T>
void List<T>::pop_front() {
  assert(!empty());
  Node *victim = first;
  first = first->next;
  delete victim;
}
21.2.7 Linked_List: print 这个 list
这里介绍一种很新的 for 循环方式。其实也不是很新,就是和普通的不一样。
总之 for loop 的第一个 statement 是循环变量及其初始值;第二个 statement 是循环条件;第三个 statement 是 iteration 语句。
因而我们可以在第一个 statement 创建一个指针 np,给它赋 first 的值来让它指向 linked_list 的首个元素,接着让它 iterate 为每个 next 指针,直到它到 nullptr 也就是 traversal 到了 linked_list 的最后一个元素为止。
于是我们将通过这句 for 表达式: for(Node *np = first; np != nullptr; np = np-> next) 来 traversal 整个 linked_list.
template <typename T>
void List<T>::print(std::ostream &os) const {
  for (Node *np = first; np != nullptr; np = np->next)
    os << np->datum << " ";
  os << std::endl;
}
21.2.8 Check the Big Three
Review: the Big Three 指的是
- dtor
- copy ctor
operator=
Rule of the Big Three 指:如果我们要给这些中的任何一个 custom 而不是使用 default,那么我们就需要为剩下两个也 custom.
我们首先看到:
template <typename T>
void List<T>::push_front(T datum) {
  Node *p = new Node;   // new 一个新 Node
  p->datum = datum; // 给 Node 赋值
  p->next = first;  // 让 p 指向原本的首元素
  first = p;    // 让 first 指向 Node
}
在 push_front 中我们使用了 dynamic allocation 来创造 Node,也就是说这个 Linked_list 是和 Dynamic memory 中的 objects 关联的!因而我们必须要通过 custom dtor 来 delete 这些 dynamic objects.
因而根据 Rule of the Big Three,我们必须 custom dtor, copt ctor 和 operator=.
Review: 我们要做一下的事情:
Dtor:
- Free resources
Copy ctor:
- copy regular members
- deep copy resources
operator=
- 检查 self-assignment
- free resources
- copy regular members
- deep copy resources
- return *this
21.2.8.1 Dtor: 即pop_all()
template <typename T>
List<T>::~List() {
  pop_all();
}
我们现在 implement pop_all: 其实就是不停 pop_front() 直到 list 为空
template <typename T>
void List<T>::pop_all() {
  while (!empty()) {
    pop_front();
  }
}
21.2.8.2 copy ctor
template <typename T>
List<T>::List(const List &other)
  : first(nullptr) {
  // No regular members to copy
  push_all(other);
}

template <typename T>
void List<T>::push_all(const List &other) {
  assert(empty());  // 确认当前为empty
  Node *last = nullptr;
  for (Node *p = other.first; p != nullptr; p = p->next) {
    Node *q = new Node;
    q->datum = p->datum;
    q->next = nullptr;
    if(last == nullptr) { // this is currently empty
      first = q;
      last = q;
    } else {
      last->next = q;
      last = q;
    }
  }
}
21.2.8.3 operator=
template <typename T>
List<T> & List<T>::operator=(const List<T> &rhs) {
  if (this == &rhs) return *this;
  pop_all();    // free resources

  // No regular members to copy

  push_all(rhs);    // deep copy
  return *this;
}
21.2.9 Linked_list: insert 在 index n 插入一个 element
// EFFECTS: Inserts datum at index n in the list
template <typename T>
void List<T>::insert(T datum, int n) {
  if (n == 0){  // n==0: 插入为首元素
    push_front(datum);
    return;
  }

  // n != 0 继续运行
  // 这里的两个指针, 一个用来连接前面的 Node, 一个用来连接后面的 Node
  Node *c = first;
  Node *p = first;

  while(n > 0) {
    if (c == nullptr) return;
    p = c;
    c = c->next;
    n--;
    // p, c 的指向一直往下一个节点移动, 直到到 n 的位置
  }
  // new 一个新 Node
  Node *nd = new Node;
  // 赋值
  nd->datum = datum;
  // 和后面的 Node 连接
  nd->next = c;
  // 和前面的 Node 连接
  p->next = nd;
}
21.3 Doubly Linked List
template <typename T>
class IntDList {
//...
private:
  struct Node {
    Node *next;
    Node *prev;
    T datum;
  };
  Node *first;
  Node *last;
};
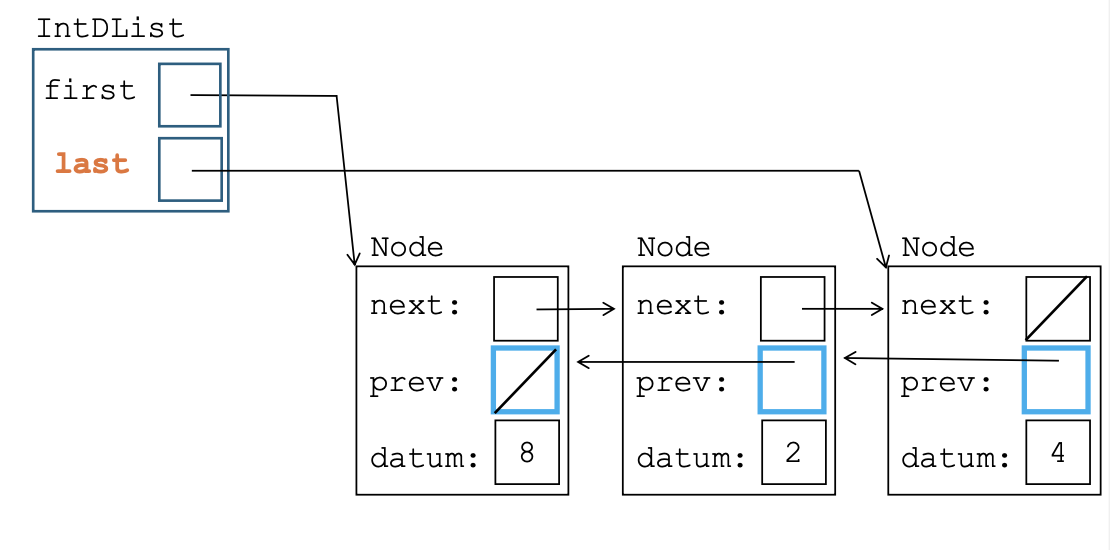
这能让 push_back 和 pop_back 更加 efficient.